
Updated xTool D1 Pro Review
NOTE: xTool provided me a D1 Pro + RA2 Rotary kit for review. All other accessories mentioned were purchased by me. xTool has never attempted to influence my review.
First of all let me expand on my note above. Had I not been impressed with the xTool experience I would not have purchased any accessories. So far I have bought an IR module, a Honeycomb kit , an Extension Kit with 1 additional Honeycomb panel, 8 risers, and a Laser Parts Kit. And now I’m eyeing the Air Assist kit because a friend of mine has one and it is SUPER quiet.
Also it pulls about 17 watts and the current LOUD air assist pump i use now pulls about 40 watts. If I run a job and I have any concern that a power loss would ruin the working piece……..I use a portable power supply such as a Jackery.
Anyway, I’ve had my machine about a month now and I have a few more things to say about it. Some may be things that I have mentioned before but have become more and more impressed with. But first here’s my setup:
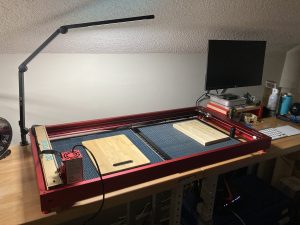
Extension kit, anyone?
I added the Extension kit which makes this thing a beast with a working area of 430mm x 930mm (16.9″ x 36.6″). That’s over 3.5′ long!
I do some work with Live Edge planks of wood which are large. Typically, I make them for campers and they might have an engraving of a Compass, then the State they are from, and then the family name.
In the past I have had to treat this as 3 separate operations, moving the wooden plank and painstakingly set up each position. NO MORE! One and done, baby. So right off the bat let’s just say I love the size of the extension kit. Only one thing to note about the honeycomb panel is that it is possible when cutting to mark up your table where the two pieces butt up against one another. I may have to get some aluminum tape or something to deal with that seam. Or make a large plywood spoil board. Probably that’s the smart move.
PORTABILITY
I posted the picture of my Extension kit (above) on the xTool forum and a few people mentioned that I’m indoors and unventilated. I should say that I have a dedicated room, upstairs, far from where we mostly live in the home and a closed door and an open window go a long way. Also, remember just above when I mentioned the portable power supply? Even this big, extended machine is pretty light. I just pick the thing up, and set it outside and plug it in. Problem solved and in fact I’ll probably do just that with a 3′ long piece of live edge Cherry that i just prepped. I don’t think we should ever forget that these machines are PORTABLE. Your xTool D1 Pro can be operated almost anywhere, and in fact is ideal for pickup truck tailgate operations, or setting up as a vendor at the local festival or flea market.
A D1 Pro 10 watt has a machine power use of 60 watts. Combined with an xTool Air Assist kit that is 17 watts a user can run about 5.7 hours on a 500 watt Jackery portable power supply. Let me state that this would be CONTINUOUS USE AT 100% POWER. . No one is going to do that at the vendor table. You’re going to engrave on and off, and at lower power settings most of the time. You could double or triple that run time. It is certainly enough for a full day session.
Accuracy
The more I use this machine the more I respect the accuracy of it. I previously owned a couple of Ortur Laser Master 2 machines. Decent machines, but they were essentially 1st or 2nd generation desktop lasers. The accuracy is just sorta okay. Many times you’ll run a job, and it will complete, and then the laser head will re-home. And then you’ll think to yourself, “I’m going to run this job one more time and darken it up”. And then pass number 2 is clearly off a little bit causing line doubling and now your part is RUINED. I have not yet once experienced a bad 2nd, 3rd, or even 4th pass on my xTool D1 Pro. The accuracy is amazing. Just for fun I did a video on repositional accuracy after installing the Extension Kit to demonstrate how well it works.
3 1/2′ is a long way to travel, go home and come back right on the money. Kudos to this machine for its accuracy.
Risers
 Back in the day it was fashionable to put a soup can under each laser leg to raise the machine height, and that is surely smart and economical and sometimes you do what you have to do to get the job done.
But the engineering behind these xTool risers is amazing. They are small, very strong, and stay vertical even 4 high.
Best of all they are unobtrusive and don’t occupy much real estate and it is very easy to work around them. And they are CONNECTED physically to the machine. Bump a soup can and your laser will crash and burn. I can’t say enough good things about the design of these risers. The more I use them, the more I love them.
Frame Rigidity
 You can have the most accurate stepper drivers with a big money motherboard but if the frame isn’t rigid, you won’t have reliable accuracy.
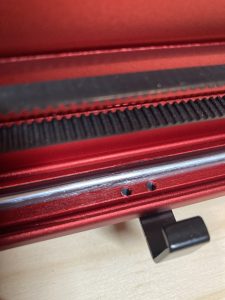
The frame is solid aluminum and there are stainless steel rails. The axis movement is over these rails with stainless steel rollers. This gives you precise and repeatable movements.
My first desktop laser would shake back and forth when it performed fast movements.
The rigid frame also allows for quicker speeds. Quicker speeds equals less production time and more money. When I installed the extension kit I couldn’t believe the weight and strength of the new side rails. I can guarantee a lot of thought and engineering went into the design of this frame. Even the way the front and back of the machine are attached to the side rails provides maximum rigidity and strength.
Generational Improvements
In 2019 the era of the desktop laser began to take off. At that time the DIY community was instrumental in improving the product with the addition of such items as:
- Adjustable Z height
- Focusing verification
- Add on Air Assist support
- 3rd party after market parts such as metal nozzles and air assist components. 3D printed parts melted frequently.
- Wire management
- Laser frame legs to raise the unit height
- Better focus methods for cutting
It seems the xTool design team and engineers were watching as almost all of these, if not all of these were incorporated into the current designs. A good way to observe product maturation is to see what the DIY’ers are doing. I’m not really seeing any movement from the DIY community. No one is really posting about any widget they invented and 3D printed to aid in laser usability. That is indicative of a pretty mature product. Future improvements will probably be in main board and laser development.
Customer Service
I’m pretty impressed with the level of customer service. The xTool D1-Series Facebook User Forum seems to be monitored and I have heard a few reports of xTool employees reaching out to customers who have issues. This includes myself. I posted a video of behavior of using a 20 watt module, then switching to the IR module and then switching back to the 20 watt. I didn’t document a problem, just an observation of how it changed some settings. xTool Support reached out to me for additional information and I was stunned and amazed. Imagine a company who wants to discuss support issues with their customers. You just don’t find many of these in this day and age.
What Would I Like To See?
There are a few things I’d like to see happen. Whether they happen or not is not a deal breaker for me but hey, my blog, my dreams.
- Some spare parts are hard to get or currently unavailable for purchase. That means that if a user experiences a main board failure your machine is simply down. Also the lens protectors are Out Of Stock. Every user should have 4 or 5 of these on hand at any given time. NOTE: The Lens Protectors are now in stock here.
- It would be cool to be able to buy just a frame assembly with no laser head. In my case I have an IR module. If I could buy a complete frame assembly I could have a 2nd dedicated machine for the IR module. And in the event machine #1 broke down, I’d still have an operational machine. Also a user could set up a dedicated rotary machine.
- Some documentation could stand to be cleaned up. The build instructions for the Extension Kit were really good but after the last zip tie was installed there were no directions for setting the bed size in xTool Creative Space, or Lightburn. The information is available on the website however, it should be in the manual.
- I’ve been using 3 axis equipment for some time and the most accurate movements are realized by using lead screws instead of using belts. That would be an interesting, but clearly more expensive upgrade.
For me to own something for a month and use it almost every day and only come up with some logistical recommendations and a pipe dream is pretty noteworthy in and among itself. Hopefully the upcoming months will remain the same.
Very new to this and looking for things to make it easier, especially lining up projects with laser. Is there a camera system you recommend? More help or hindrance?
Thank you for your time