
I bought a new Uniden BCD436HP scanner and decided to install the programming software Sentinel. I have a couple of computers and decided to do this clean. And that’s when I realized that using Sentinel for the 1st time is really kind of a beast. There are a LOT of settings that you probably should run through prior to writing your configuration to your scanner.
The BCD436HP and all of its big brothers are touted as being EASY to program.. By golly you can just plug your zip code into it and it will just start scanning. While that is true almost constantly on the scanner forums you will see someone do just that and then post:
“Why can’t I hear the Fire Department? Why can’t I hear…….xxxxxx?
Well, it’s because certain service types aren’t turned on by default.
NO MATTER WHAT, NO MATTER HOW EASY IT WAS YOU WERE TOLD……….THERE IS SOME LEVEL OF PROGRAMMING WORK NEEDS TO BE DONE. DOING THAT IN SENTINEL IS FAR EASIER THAN DIGGING THROUGH THE MENUS ON THE SCANNER ITSELF.
Let’s get to it, shall we?
Connect your scanner via USB and this screen will pop up. Press the “E” key depicted to get into Mass Storage mode. This lets your computer see the SD card that is in the scanner.
Mass Storage (click pic to enlarge)

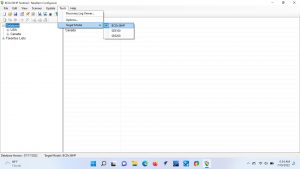
Now open Sentinel and set the target model scanner under Tools > Target Scanner, in this case the BCD436HP
Now you should take your brand new scanner and copy the configuration to Sentinel and then SAVE that configuration. Worst case, no matter how bad you foul up, you can make the scanner fresh and new again. (All this is after you set the clock on the brand new scanner). On the toolbar line there is an icon with a scanner and an up Arrow on it. Push that and it will import the default scanner settings into Sentinel and then you can save your configuration somewhere.
Icons (click pic to enlarge)

The second circle I have depicted is your scanner settings. It’s worth going through these before uploading. But we’ll hold off just a minute on this because we haven’t selected anything to upload.
Yes you can put your zip code in and start listening but we talked about that before, didn’t we? Let’s establish a Favorites List. Click on Database > USA > North Carolina (or your location) > Craven County. Select something, right click on it and “Append to Favorites List”. Rinse and repeat for the things you actually want to listen to. IT REALLY IS THAT SIMPLE. Find what you want, right click, Append to Favorites.
In my favorites list I go through North Carolina Statewide and Craven County and Select the following things and add them to my favorites:
- New Bern Public Safety
- North Carolina VIPER
- Craven County Analog
- Craven County Businesses
- Local Railroad Line (Norfolk Southern)
That’s it, that’s all I want to listen to.
Now back to the settings. The first box to open up when you click the icon is “Scan Selection”
Scan Selection (click pic to enlarge)

Under monitor those lists may be set to OFF however you can toggle them ON here. No point in selecting Favorites and uploading them and then having to toggle them on in the scanner menus. Notice “Monitor Full Database” is selected. If checked it will bring in EVERYTHING. I usually leave it checked and then toggle it off in the scanner (which is just the opposite of what I just told you to do). 😃
The next box is Service Types. This is maybe the most important one. I just enable them all. When you do that and Monitor Full Database you are in for a treat. You’ll grab about every damn radio transmission out of the air near you. Your scanner will scan SLOWLY though and you’ll miss stuff. And it will catch all manner of analog static and stop in a about a million places and you’ll have to hit the Avoid button to move past it. If you program in Railroads as I did and the Railroad Service type is not checked………..you won’t be “working on the railroad”.
Service Types (click pic to enlarge)

Location Settings are next. If you know your exact lat long you can put it in here. Easiest just to input your zip code. From here you can set your range as well. I don’t want to hear too far out into the ether so I set a 20 mile range. You can set your trunking systems up to use Location Control in conjunction with this setting.
Location Settings (click pic to enlarge)

I’m not going to go through every screen but just hit the ones I mess with which should be enough to get you started. The next one I do is “Display Options”. The only thing I mess with here is the Backlight setting which I usually set to 5 second squelch. (this is just the default screen though).
Display Options (click pic to enlarge)

Lastly is Miscellaneous. This has a lot of good stuff. You can set the Time Zone, and the starting volume and squelch. And the Key Beep. Damn scanner beeps too loud especially in the middle of the night when listening is best and your wife is asleep.

There is one other setting I like to toggle but it must be done in the Favorites Editor and that is to set your Scanning from ID Scan to ID Search. ID Search will pull in calls even if the Talk Group ID is NOT in your Favorites list. It will show as Unknown TGID and just display the Talk Group ID number on the screen. You won’t know who it is but you won’t even hear it if you are set to ID Scan.
In Sentinel go to Edit > Edit Favorites List. Then select the favorite (trunked channel) you want to set to ID search and then toggle it from Off to On.
ID Search (click pics to enlarge)
")
")
")
That’s enough to get you going. Click on the “Write To Scanner” icon while connected via USB and your scanner config will be sent. Remember you may have set Monitor Full Database but you can go into the Menu in the scanner and toggle it off under Set Scan Selection > Select Lists To Monitor.
Full Database (click pics to enlarge)


That’s it. I’ll try to clean this blog up here and there to make it more friendly over the next few days.
Thank you for the article. This helped a lot.
Thank you. I will definitely save your site. Scanner talk for dummies. I need this. Already have iPhone for dummies.
This was incredibly helpful and got me going quickly Thanks!!
Thank you so much man! I’ve been confused on all these setting for the past 2 weeks and your post got me situated. 🙂
Breaking it down in small bites like this is very helpful. I hope Uniden gets to see this.