
I just did a blog on booting a Pi 4 Compute Module from an NVME drive. I’ll provide a Build Of Materials (BOM) for duplicating this project. Here are the primary components:
Compute Module 4 Build of Materials
| Component | Cost | Description |
|---|---|---|
| CM4008000 | $75 | CM4 Lite 8GB No Wifi, No Bluetooth |
| NVME PCIe Adapter | $11 | NVME Adapter |
| Samsung EVO 970 Plus 2TB | $203 | NVME Drive |
| CM4 IO Carrier Board | $35 | Carrier Board for CM4 |
| SD Card | $9 | SD Card (optional). Not required if your CM4 has eMMC. |
| Power Brick | $9 | Power Brick. Just picked the first one I saw on Amazon. Any 12v , 2 amp or more will do. Get a 5.5mm connector. |
So for just over $300 you can have an amazing file server. Also if you back off the 2TB Samsung EVO970 to a 1TB drive you can save $100 roughly. You can buy a cheaper Compute Module as well IF YOU CAN FIND ONE. A 2GB one is fine for serving files. For around $200, or a bit less you can have a solid, and adequately fast file server.
So you don’t need an SD Card if you have eMMC on your CM4 and consequently you don’t need a micro USB cable to change the Boot Order on a Compute Module Lite with no eMMC. That is unless you want to change the Boot Order anyway.
So my CM4 was the CM4008000 which is 8GB of DRAM memory with no wifi or bluetooth. This was fine for me as I’m connecting this directly to my ethernet switch. Any file server should be wired if possible.
In this configuration you have to boot from an SD card initially. Best way to prepare the card is with Raspberry Pi Imager.
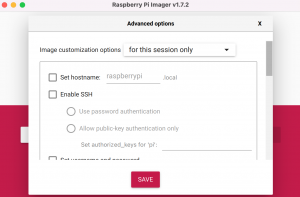
Pi Imager Secret Screen
And the best way to do that is to open the Advanced Options menu and pre-fill your data. You can set wifi settings as well (but I don’t have a wifi CM4).
To get to these hidden Advanced Options you hit Command + Shift + X on a Mac or Control + Shift + X on a Windows computer.
Note that you can enter SSH information here. This is invaluable.
Once you’ve pre-filled that information you then Choose OS and your Write Destination. If your write destination is eMMC you will have to use a utility called RPIBOOT to make your CM4 eMMC memory visible to Raspberry Pi Imager as attached storage.
Before you boot from your SD card you need to go ahead and install your PCIe adapter with NVME storage installed.
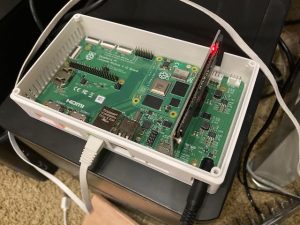
CM4 IO Board with PCIe Adapter and NMVE Drive
Now you can boot your CM4. I do everything headless with mine which is why I set up SSH in the Advanced Options when making the SD card.
If you aren’t connected to ethernet at this point you’ll need to have a monitor, keyboard, and mouse connected.
But it is SOOO easy to do all this via SSH without all that messy attached hardware.
Anyway, however you do it click on the Pi icon in the upper left of the screen, then go to Accessories > SD Card Copier. Copy your SD Card to your NVME drive and be sure to check the box that says, “New Partion UUIDs”
SD Card Copier (click pic to enlarge)

Once the copy completes you should be able to shut down, remove the SD Card and boot directly from the NVME drive.
If you have a CM4 that has eMMC memory you HAVE TO SET THE BOOT ORDER TO BOOT FROM NVME FIRST. I covered how to do that in my previous blog.
Your Pi should be much faster with way faster hard drive read, write, and access times. If you really want to zoom things along you can overclock. The CM4 pretty easily overclocks to 2.0 GHz. But you’ll need active cooling. I don’t like the noise and I’m not a benchmark geek so just booting from the NVME drive is fine for me.
I’d like to add that in this day and age you can buy a fancy computer appliance that is passively cooled, shaped like a little brick and very nice in general for about the same amount of money. There is no disputing this however, next week can you turn that device into a SATA array of hard drives? Nope. The hardware won’t allow it. Can you add a big giant sound card to it? Nope, The hardware won’t allow it. Can you pop out the CPU and put it in a drone or robot or other embedded device? Nope. I guess what I’m saying is that the Pi Compute Module allows for a ton of flexibility and is somewhat future proof, at least a little more so than the aforementioned computer is.
Have fun trying to score a Compute Module 4 though. It took me a couple of months to get three, with 2 of those being 2GB versions that I didn’t really want. You take what you can get in this wonderful world of Supply Chain failures.
Moin John, sehr gute Darstellung. Habe dazu 2 Punkte.
1. Das Booten von eMMC ist schneller als von der NVME und macht daher keinen Sinn auf der NVME das OS zu installieren.
2. Die 2GB CM4 sind ausreichend als File-Server mit Samba. Habe dazu noch Pi-Hole installiert.
Gruß Bernd
Translation:
Hi John, very good performance. I have 2 points for that.
1. Booting eMMC is faster than from NVME and therefore makes no sense to install the OS on NVME.
2. The 2GB CM4 are sufficient as a file server with Samba. I also installed Pi-Hole.
Greetings, Bernd
Thanks much!