
I built my first Raspberry Pi Compute Module 4 project. A 1TB NAS Drive using an NVME drive.
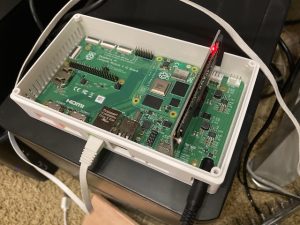
CM4 with NVME on PCIe Connector
These are the required parts:
| ITEM | Description | Cost |
|---|---|---|
| CM4 2GB RAM 32GB eMMC | Raspberry Pi Compute Module 4 CM4102032 | $55 |
| Carrier Board | Raspberry Pi Compute Module CM4 IO Board | $35 |
| Power Supply (various sources) | 12 volt minimum 1.5 amps, 5.5 mm barrel plug | Had one laying around. Maybe $10-$15 |
| PCIe to M.2 Adapter | Xiwai Low Profile PCI-E 3.0 x1 Lane to M.2 NGFF M-Key SSD Nvme AHCI PCI Express Adapter Card | $8 |
| NVME SSD | SAMSUNG 970 EVO Plus SSD 1TB, M.2 NVMe | $109 |
Let’s talk about the parts somewhat.
The Compute Module itself was tricky to find. Because of the global supply chain shortage of semi-conductors, Raspberry Pi’s are tough to get in any form. The compute module may be the toughest to get. While I wanted an 8GB module I had to settle for a 2GB. After weeks of waiting I finally found availability at SeeedStudio and they only had 100 in stock so I had to act quick. I do have an 8GB on back order but I don’t really expect to see it until Oct or so. Seriously.
There is a cool website someone made that tracks Pi stock at authorized resellers. Check it out.
Everything else is fairly self explanatory. I didn’t provide a link for a power supply because I already had a 12v 4 amp brick laying around. While I mentioned 1.5 amp minimum above if you are playing with the PCIe bus and the components that plug into them………the more current the better. I really recommend 3 to 4 amps. In this case the adapter and NVME drive probably are fine on 1 or 1.5 amps as the things that I have read say they only need about 10 to 11 watts. A one amp brick will give you 12 watts. That being said, good old electronics theory says you really shouldn’t load things up near 100%. Best to go at least 1.5 amps.
And while I linked the Samsung EVO970 at Amazon in the chart above I actually just ran up to Best Buy and got one at the same price.
And I was able to print a cool case for the whole thing from this file on Thingiverse.
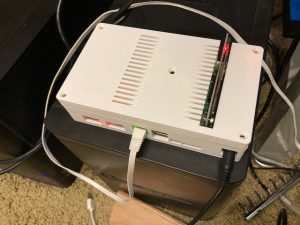
3D Printed case for CM4 with NVME adapter
While it is possible to boot from the NVME drive, my Pi has eMMC Memory where Pi OS (64 bit) is installed. I’ll leave that as it is. If I had a Compute Module that booted from an SSD then I would go ahead and make the NVME drive the boot drive. Installing Pi OS on eMMC is a different beast and I described that process here.
Also the PCIe adapter will not be recognized by Pi OS until a drive is actually plugged in. I described that issue here.
Once the drive is installed and Pi OS booted then you can issue an “lspci” and “lsblk” to see if it was recognized.
pi@CM4PI:~ $ lspci
00:00.0 PCI bridge: Broadcom Inc. and subsidiaries BCM2711 PCIe Bridge (rev 20)
01:00.0 Non-Volatile memory controller: Samsung Electronics Co Ltd NVMe SSD Controller SM981/PM981/PM983
pi@CM4PI:~ $ lsblk
NAME         MAJ:MIN RM   SIZE RO TYPE MOUNTPOINT
mmcblk0      179:0    0  29.1G  0 disk
├─mmcblk0p1  179:1    0   256M  0 part /boot
└─mmcblk0p2  179:2    0  28.9G  0 part /
mmcblk0boot0 179:32   0     4M  1 disk
mmcblk0boot1 179:64   0     4M  1 disk
nvme0n1      259:0    0 931.5G  0 disk
└─nvme0n1p1  259:1    0 931.5G  0 part /mnt/nvme
pi@CM4PI:~ $
Looks good! I formatted the drive with gParted
sudo apt-get update
sudo apt-get install gparted
And then made a mount point and made it auto mount by modifying /etc/fstab
Real clear directions for doing that are found here.
Finally I added Samba to expose the mounted drive (and home directory) to my network.
Samba (click pic to enlarge)

I will probably play around with some other PCIe devices soon but you have to get your feet wet first. Adding a PCIe NVME drive is pretty easy provided your adapter card and drive are supported by the Pi OS kernel.