
UPDATE Jan 31 2021: I updated from Pi OS Buster to Bullseye which broke the Geekworm fan control. The only way to get it going again was to do a fresh installation.
This was a fun albeit unnecessary project that costs a few bucks. I wanted to build a small portable NAS around a Raspberry Pi 4.
I ended up buying parts to create a polished, professional looking solution that utilizes a SATA 2.5″ SSD. Here are the parts I bought:
- Geekworm X825 version 2.0 SATA expansion board $30
- Geekworm X825 version 2.0 metal case and power switch $26
- Geekworm X735 version 2.5 Power Management and Cooling Fan board $28
- Raspberry Pi 4 with 8GB RAM $75
- Crucial 2TB SSD $173
Geekworm Stuff
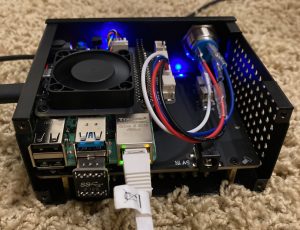
This is a good looking case and I obviously have the front panel off of it for this picture.
There are a few things you need to know about this set up though. It may or may not be the solution for you.
First the case fit and finish is beyond exceptional. The SATA board is excellent for mounting the SSD on the bottom side and pogo pins make the appropriate connections to the Pi.
Make no mistake though. The SSD is connected via the USB 3.0 bus. And herein lies the rub.
You can buy a Pi 4 and then get a USB 3.0 to SATA cable adapter for about $10. If you have a 3D printer you can make a case and effectively have the same setup. You can even buy WAY CHEAPER power start and shut down boards.
But I guarantee it won’t look as good or have a fancy cooling fan. It won’t crack when you throw it in the suitcase for a road trip. I think it is safe to say I bought this for a media server for my tiny camper. I need something rugged. Things get tossed around in the camper and sometimes I camp where there is no cell phone signal. The ability to watch a video is HUGE!
In no way am I knocking this Geekworm stuff. But I am saying a $10 cable essentially nets you almost the same thing.
Another thing to note: The fan doesn’t spin unless you download and run a script which also controls the power management board. THIS PRETTY MUCH MARRIES YOU TO RASPBERRY PI OS. If you install Pi OS and then install OpenMediaVault your fan won’t spin up. And their documentation does explicitly say this.
So don’t buy this with the intention of using OpenMediaVault.
Also I had an issue with the software scripts. Once your Pi OS is installed you run the following commands from their page:
sudo apt-get install -y python-smbus python
sudo apt-get install -y pigpio python-pigpio python3-pigpio git
git clone https://github.com/geekworm-com/x735-v2.5
cd x735-v2.5
sudo chmod +x *.sh
sudo bash install.sh
sudo reboot
The very first command DOESN’T WORK. I had to run this command to get it to install:
sudo apt-get install -y python3-smbus python
sudo apt-get install -y pigpio python-pigpio python3-pigpio git
git clone https://github.com/geekworm-com/x735-v2.5
cd x735-v2.5
sudo chmod +x *.sh
sudo bash install.sh
sudo reboot
Not a huge difference BUT someone without Linux experience would throw up their hands in frustration when the first command failed.
Before I did all this I set the Pi up to boot from the SSD and got rid of the SD card. You do need to first set up an SD card and boot initially with it. After you boot run the following commands:
sudo apt-get update
sudo apt-get full-upgrade
sudo rpi-update
sudo apt-get install gparted
Now reboot and run gparted. NOTE: If your SSD is formatted with FAT 32 you don’t need to do this.
Anyway run gparted, and select your SSD and format it with FAT 32. Reboot. Now go to Accessories > SD Card Copier and select your SD card as From and the SSD as the To or Destination drive.
Now run this:
sudo rpi-eeprom-update -d -a
It should come back and tell you your boot loader is the latest and greatest. Then run:
sudo raspi-config
Select Advanced > Boot loader version. Select the 1st option and and then answer “No” to the defaults.
Go back to Advanced > Boot Order and select USB.
Shut down, remove your SD card and then reboot. It should boot normally from the SSD.
Now you want to share that big SSD Drive on your network. Install Samba:
sudo apt-get install samba samba-common
When installed do this:
sudo nano /etc/samba/smb.conf
Scroll down through the file and find the part that says “read only = yes” and change yes to no. Make sure your home directories are writeable and readable. Then go down to the shares section and paste in the following. NOTE: You can share any directory. I made a folder named piNAS in my home folder. While I was doing this and taking notes my wife peeked over my shoulder and asked me why I was looking at or writing about penis. BWAHAHAHAHAHA. I had to explain what a Pi and a NAS was 😃
[piNAS]
   comment = piNAS Share
   browseable = yes
   writeable = yes
   path = /home/pi/piNAS
   read only = no
Make sure your path is correct. Hit CTL + X and answer Y to save. Now create a Samba user.
sudo smbpasswd -a pi
Type in a password twice and hit enter. Almost done. Now restart Samba
sudo service smbd restart
You should be able to find your Samba share in your network folder.

Samba share from your Pi
Now your fan works, your power management works, and you are sharing files across your network.
IF YOU WANT TO RUN OPENMEDIAVAULT THEN BY GOLLY BUY A PI, A $10 ADAPTER CABLE, AND AN SSD AND DON’T DROP OVER $100 ON ALL THIS STUFF.
I like it. I love it. But it isn’t exactly the cheapest solution.