
Decided to put an attic fan in over the garage and tried to find a “smart” one. Sure enough Quietcool makes them and even better they have an ESP32 wifi chip in them which can be flashed with Tasmota.

ESP32
This means the fan can be controlled locally with Home Assistant and doesn’t need a separate app to control it.
Also while having an attic fan being smart it doesn’t need to be super smart. You want them to come on at a certain temp and go off at a certain temp.
The manufacturers app has too much going on in my opinion. And with these apps you just have no idea what they are up to.
The only person who has any business knowing my attic fan is on or off is ME. Not QuietCool, not Google, just me.
DISCLAIMER: This is not my work. I was walked through this by user kwikSi1ver on the Digiblur Discord discussion group. I am only documenting this for posterity and re-creation purposes. Again, I claim no credit for this.
Flashing with Tasmota is really no issue. I can do that. The magic and genius behind this is the reverse engineering. Telling what relay to do what. Making sure both relays don’t come on at the same time. Making sure the power LED comes on. Making sure all the sensors are recognized and spew out the right information and are DISCOVERABLE.
Yep, anyone can flash Tasmota. The guys who reverse engineer stuff get all the credit. But first ya gotta flash it. But first lets back up the manufactures firmware in case something goes wrong.
Lets use ESPTool. On a Mac you can install it easily by issuing the following command in the terminal:
pip install esptool
Let’s hook up the board for backing up and flashing. You can just crack open the case and do everything from the bottom of the board. No need for complete disassembly.
QuietCool FTDI Hook Up (click pics to enlarge)


Once connected to the FTDI and the Boot Pin (GPIO0 is shorted) plug in your USB cable. You should just get one red light to indicate you are in boot loader mode. Go to the terminal in Mac and issue this command:
ls /dev/*
This will let you know what your COM port is. Mine was:
/dev/cu.usbserial-A10KP8TL
Now the backup command. Be sure to change the com port to whatever yours actually is.
esptool.py -b 115200 --port /dev/cu.usbserial-A10KP8TL read_flash 0x000000 0x400000 flash_4M.bin
This takes a while. Like 10 mins or so. Be sure to save this file somewhere.
Now you have to follow the directions for flashing Tasmota for ESP32. This is the command but WE ARE NOT READY JUST YET.
esptool.py --chip esp32 --port COM5 --baud 921600 --before default_reset --after hard_reset write_flash -z --flash_mode dout --flash_freq 40m --flash_size detect 0x1000 bootloader_dout_40m.bin 0x8000 partitions.bin 0xe000 boot_app0.bin 0x10000 tasmota32.bin
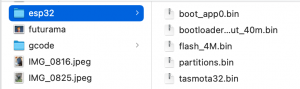
Okay, lets do some things. Notice in the command above there are some reference to some bin files. You need to flash from a folder that contains those files.
Go to this website and download the Code (its in a zip file. Green button on the page that says code). Go to the static directory > then ESP32 directory. There are your files.
Lastly download Tasmota32.bin and place it in the same directory (my backup file is in here too. You only need the 4 files).
CD into that directory and this is where you will issue your command that we posted above. Only make sure your COM port is correct.
esptool.py --chip esp32 --port /dev/cu.usbserial-A10KP8TL --baud 921600 --before default_reset --after hard_reset write_flash -z --flash_mode dout --flash_freq 40m --flash_size detect 0x1000 bootloader_dout_40m.bin 0x8000 partitions.bin 0xe000 boot_app0.bin 0x10000 tasmota32.bin
This doesn’t take too long. Here’s a quick vid I made on the process.
[kad_youtube url=”https://youtu.be/zpQD4afOAlc” ]
Once flashed disconnect the FTDI and plug the fan in the wall. The FTDI doesn’t seem to have enough OOOMPH to power the AP hotspot. Once plugged in the wall it will create a Tasmota hotspot which you can connect and then go to 192.168.4.1 in a browser. Tasmota wants your network credentials and then connects to your wifi network. Once you connect to THAT IP address it comes up with a generic template.
Go to Configuration > Configure Other and paste in the following template:
{"NAME":"QuietCool-AFG-SMT-PRO-2.0","GPIO":[1,1,1,1,1,224,1,1,1,1,1,1,1,1,640,608,0,1,1,225,0,1,1,1,0,0,0,0,1,1,1,1,1,0,0,1],"FLAG":0,"BASE":1,"CMND":"Interlock 1|WebButton1 Low|WebButton2 High"}
Click the Activate Button just below it and hit save. It will reboot and look like this:
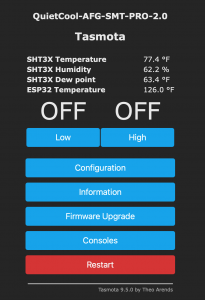
If you need the temperature display units in F instead of C go to the Tasmota Console and issue
so8 1
Lastly the front of the box has two buttons. One was Test and one was Pair. Since we are no longer bluetooth pairing with the manufacturers app we can map those buttons to Low and High fan speed for manual setting at the fan.
Go to Configuration > Configure Template and set GPIO 26 to Button 2 and then set GPIO 27 to Button 1. Hit save and the controller reboots. Now the buttons work as high and low. I’m playing around with the LED lights now and it isn’t as easy as the buttons were.
Anyway the advantage here is manual control at the fan itself. Let’s say you are rooting through boxes in the attic and it’s hot but not hot enough for the fan to kick on. You can just go kick it on.
We will control the fan with Home Assistant automations which I haven’t gotten around to yet because I haven’t mounted the fan yet. Basically we will want a few automations. Both the low and high speed control was auto detected by the Tasmota integration so we can use those entities to control the fan. We’ll want to:
- Turn the fan to low when it reaches a certain temperature
- Turn the fan to high when it reaches a certain temperature
- Shift from high to low as the temperature lowers
- Shut the fan off when the temperature gets below whatever temp threshold we set.
Also kwiksi1ver wrote a rule for turning the fan off at 182 degrees. Don’t laugh. This is a safety protocol the manufacturer uses. If there is a fire, you don’t want a big old nasty super strong fan pulling fresh oxygen into it or spreading the fire somewhere else. The rule you paste in your Tasmota console is:
Rule 1 ON SHT3X#Temperature>182 DO Power0 0 ENDON
Then run
Rule 1
This last command loads the rule.
So even though the manufactures app is slick and I can control my attic fan with it………it works in the Cloud. That app lives on your phone, your network, and you really don’t know what packets of information it is capable of sending or receiving. Let’s also assume that QuietCool are straight up red, white, and blue Americans who would never do anything nefarious. What if their code has gaping security holes in it which can be exploited? Someone can hack your whole network because your fan software sucks. Again I am NOT saying this is the case, but this is how hacks work.
Look up the Marai Attack sometime if you don’t think Internet of Things (IoT) devices can be hacked.
So we took our fan and gave it local control. No Cloud. It does exactly the same job but without a pretty app.
UPDATE: Finally installed it in the attic. Works like a champ!
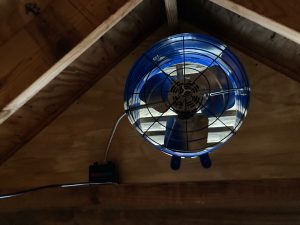
Installed and Tasmotized
Let’s write some automations for Home Assistant. The following turns the fan on low at 90 degrees. (You can set the temps for anything you want).
- id: '1634635563289'
  alias: Turn on Attic Fan to Low at 90 Degrees
  description: ''
  trigger:
  - platform: numeric_state
    entity_id: sensor.attic_fan_sht3x_temperature
    above: '89'
  condition: []
  action:
  - service: switch.turn_on
    target:
      entity_id: switch.attic_fan_5
  mode: single
Now we kick it up to high speed at 100 degrees F.
- id: '1634635179197'
  alias: Turn on Attic Fan High at 100 Degrees
  description: ''
  trigger:
  - platform: numeric_state
    entity_id: sensor.attic_fan_sht3x_temperature
    above: '100'
  condition: []
  action:
  - service: switch.turn_on
    target:
      entity_id: switch.attic_fan_84cca86897a8_switch_relay_1
  mode: single
Now lets throttle it down as the temp drops. I set mine to kick to low only if the fan is on high already and the temp gets below 95.
- id: '1634635415683'
  alias: Throttle Attic Fan to Low at 95 Degrees
  description: ''
  trigger:
  - platform: numeric_state
    entity_id: sensor.attic_fan_sht3x_temperature
    below: '96'
  condition:
  - condition: state
    entity_id: switch.attic_fan_84cca86897a8_switch_relay_1
    state: 'on'
  action:
  - service: switch.turn_off
    target:
      entity_id: switch.attic_fan_84cca86897a8_switch_relay_1
  mode: single
Finally we’ll shut it off when it gets around 88 degrees.
- id: '1634635865967'
  alias: Turn off Attic Fan at 88 Degrees
  description: ''
  trigger:
  - platform: numeric_state
    entity_id: sensor.attic_fan_sht3x_temperature
    below: '88'
  condition: []
  action:
  - service: switch.turn_off
    target:
      entity_id: switch.attic_fan_5
  mode: single
Pretty cool, huh? And remember you can tweak these values as you wish.
Here’s a vid on how it works.
[kad_youtube url=”https://youtu.be/9Tqzoyq2qgU” ]
And that is one smart attic fan that doesn’t phone home to some foreign server.
Very Cool!!! (Pun intended)
Personally I went with a Sonoff TH16 with the SI7021 temp and humidity sensor.
Once again flashed with esphome, (I just find it viscerally satisfying to see all the devices in a single dashboard)
At “Lastly download Tasmota32.bin…”
This is located in the Tasmota zip file previously downloaded (for the ESP files).
Path (relative to the root of the zip file) is `firmware/release/tasmota32.bin`
Re `Rule 1 ON SHT3X#Temperature>182 DO Power0 0 ENDON`
The shutoff temperature is supposed to be 182 degrees Farenheit. But as far as I know the ESP is using Celsius, so the rule should be:
`Rule 1 ON SHT3X#Temperature>83 DO Power0 0 ENDON`
(182 F=83.33 C, rounded down to 83 C)
Okay, trying to come up with a RULE command that will let me control the low speed. I’m using Rule1, and changed the “fire safety” clause (mentioned above) to use BREAK instead of ENDON — this prevents all further execution with the rule set. My HVAC advisor recommended a 5-degree (F) difference between the ON and OFF temperatures, which is about 2 degrees C. I am also explicitly setting both relays (Power0 and Power1), using Backlog:
`Rule 1 ON SHT3X#Temperature>83 DO Backlog Power0 0; Power1 0 BREAK ON SHT3X#Temperature>48 DO Backlog Power0 1; Power1 0 ENDON ON SHT3X#Temperature<46 DO Backlog Power0 0; Power1 0 ENDON`
I chose 48C and 46C above because my attic is currently 46.8C and dropping, and I'd like to see the fan turn off automatically. I'll use a lower setpoint for my production system. Right now I'm just testing. Hopefully this helps somebody else!
Thanks for adding all this information to the page. Greatly appreciated.
Glad to help. And many thanks to *you* for posting your experience!
FYI, I don’t think the RULE is working out for me. I have been testing in the console, and I’ve verified that POWER1 1, POWER1 0 are working. But when I put these commands into a RULE, they are not triggering. Still investigating, will update when (if?) I figure this out.
I am getting ready to flash a new fan I just purchased. Did you ever figure out the best way to get the rules configured?
I just bought two attic fans, the two speed version. I am trying to figure out how to extract out the temperature, humidity and when the fan runs so I can graph them in Home Assistant.
I am new to Home Assistant and YAML so I don’t know enough to write my own code yet.
I uploaded one version of YAML code I found and I ended up with a ‘visit’ entry in HA where I could go look at the fan and turn it on off etc. I tried this version of code too, This version did not give me a website to look at, With both, I could not find. the values to graph.
Please help.
Keith Sproull
There is a discord group for Tasmota and those guys are pros. The guy that wrote that HA integration was over there, at least when I wrote that blog.
Pingback: QuietCool AFG SMT PRO-2.0 attic fan with Home Assistant via ESPHome – overt.org