
This is one tiny camera. Maybe a bit too tiny.
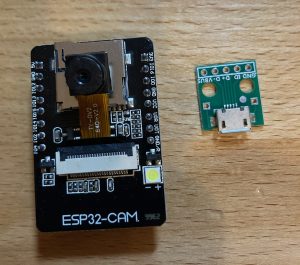
ESP32-CAM
For some perspective, the breakout board next to the ESP32-CAM has a Micro USB charger on the end of it like you would use to charge your phone.
The whole camera board isn’t a lot larger than a quarter. A bit taller though.
But look at the camera lens itself. It’s roughly the size of the USB connector on that green board.
You could put this cam anywhere there was a tiny hole. Look around your room or even worse, YOUR HOTEL ROOM, and think of all the places a tiny camera could be.
Comparatively, look at the screen on your smart phone and look at the camera lens. On a day to day basis YOU DON’T EVEN NOTICE IT, DO YOU?
Anyway, I’m not trying to creep you out but I am pointing out that it is easy for ANYONE to build a tiny spy camera or security camera. This thing will live stream as well. Let’s check it out!
You don’t need a lot to pull this off.
- ESP32-CAM – $14. Can probably get them for half that from Aliexpress
- FTDI Controller – $6. You do need one that has a 5V flashing option. This one can flash 3.3v or 5V. Most of the time you flash a chip with 3.3v but for this you need 5v.
- Dupont cables – $6. This is a whole kit. You literally need 5 cables (in this case female to female)
- MicroUSB to DIP adapter (optional) $4 for 10 of them. You don’t have to have this but it makes powering the cam up easier.
- Tasmota32 – Free download. Make sure to get the file named “tasmota32-webcam.bin”
- Flashing software – Free download. Use Tasmotizer for Windows or ESP-Flasher for Mac
That’s everything. Hook the camera to the FTDI controller like this:
ESP32-Cam wiring (click pic to enlarge)

Then you literally plug your FTDI controller into your laptop and open Tasmotizer or ESP-Flasher and select the USB port (which is probably auto detected) and select the tasmota32-webam.bin file. Then hit “Flash”.
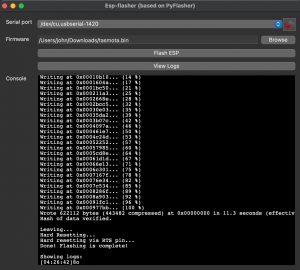
Flashing Tasmota with ESP-Flasher
That’s literally almost it. Once the flash is complete you can leave the FTDI controller hooked up but remove the jumper wire from pin IO0 to Ground and then reboot. That wire puts the device into boot loader mode. Removing it allows it to boot normally.
When you boot the ESP32-CAM module with Tasmota will broadcast a Wifi Access Point called “Tasmota-something-or other”. Connect to that wifi network. A box will pop up (and if it doesn’t), open a browser and go to 192.168.4.1
That is the Tasmota Wifi Configuration page. It needs your wifi credentials to connect to your network. It will return the IP address that it connected to on your network and then the Tasmota wifi AP will disappear. Go to the address it returned into your browser and now we need to configure the cam.
Go to CONFIGURATION > CONFIGURE OTHER and paste in the following in the Template field:
-
{"NAME":"AITHINKER CAM","GPIO":[4992,1,672,1,416,5088,1,1,1,6720,736,704,1,1,5089,5090,0,5091,5184,5152,0,5120,5024,5056,0,0,0,0,4928,576,5094,5095,5092,0,0,5093],"FLAG":0,"BASE":2}
Be sure to click the box below it that says “Activate” and then hit save. Your cam will boot up and be ready to rock and roll.
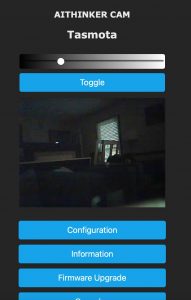
Tasmota ESP32-CAM
Some observations:
- Low light conditions are not great quality
- Turning the white LED (flash) up makes the camera unstable in my opinion. This could just be a power supply issue.
- RSTP steaming (which must be enabled) also seems unstable.
You are not getting a polished perfect camera here. You are getting a tiny camera that you program (flash the firmware) and learn how to use 3rd party firmware. You’re also getting a tiny camera that you can add somewhere where it doesn’t make sense to hang a $75 wifi camera. Just don’t be creepy, huh?
Speaking of RTSP………….that is the protocol that you use for live streaming like on Facebook or YouTube. RTSP cams are typically expensive as well. To enable RTSP go to the CONSOLE and issue this command:
WcRtsp 1
Then you can view the stream at:
rtsp://CAM_IP_ADDRESS:8554/mjpeg/1
I’ve read that VLC is the best stream viewer and there are issues with other software viewers.
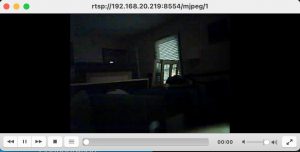
VLC Camera Stream
So now you could add the stream to Home Assistant or Motioneye or something like that. I don’t think this rivals a Wyze or Reolink cam but for the price it will do some of the light work around your home. I think I’ll put this one in the shed or something and see if I can trigger it with a motion detector.
I did not realize that tasmota had support for the esp32-cam module.
I noticed it overheating, or occasionally bogging down with the esphome module, Have you had similar problems?
Pingback: Privacy friendly ESP32 smart doorbell with Home Assistant local integration – Tristam