
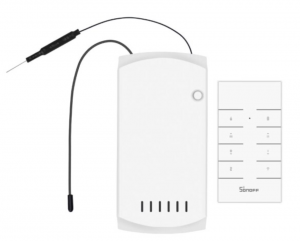
Sonoff iFan04
Introducing the Sonoff iFan04. In MOST cases you WILL NOT need one of these, however, if you have an older home where your ceiling fan and light are wired to a single wall switch and you have to control the fan by pulling on the chain………..then you need one of these.
If you have two switches it is WAY easier to buy smart wall switches. One for a 3 speed fan and one for a regular switch.
Note, that I didn’t say it was cheaper to buy 2 smart switches. It is EASIER to install the switches though.
The iFan04’s are about $18 each. That is a bargain.
One real big limitation of the iFan is that it is, errrrr…….big. Meaning you have to have space to install it in your fan. The first fan I tried to install this on in my house………….there was just no way. The ceiling baseplate cover was just too small with absolutely no room to install it. I would literally need a whole new ceiling fan before I could make it work.
In my bedroom though the baseplate was freaking enormous. Great big dome but you know what? While it fit, there wasn’t as much room as you would think.
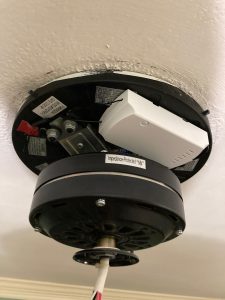
iFan Installed
And there really isn’t a method of attaching the iFan. No hooks, no clips, no screw hole tabs. Nothing.
In most instances you should want to shove it between the baseplate and inside the bracket that holds the motor. Most fans will have enough space there but don’t forget…….you have to shove all the wires and wire nut connections in that area too.
In my pic here the motor mounting bracket is really low profile so I used double side tape to hold the Sonoff in place.
Yep, 5 years from now it will probably fall and make a racket.
Another joyous part of this was a complete and total deinstallation of my ceiling fan. I had to gut it, including removing the fan blades to get to the area that you see. Oh well, it got a good cleaning while it was down and taken apart. That alone was worth the price of doing this.
Wiring was real easy.
Sonoff iFan Wiring (click pic to enlarge)

My fan, indeed had a blue wire marked LIGHT and a black wire marked FAN. They were both wired to the black hot wire coming into power the fan. So really all you do is to hook up the fan to house power, black and white 120v and then on the non powered side you wire the black fan wire up and the blue fan wire and then the remaining white wire goes to neutral. Easy.
If you live in the US and use 120v power you HAVE TO GET THE iFAN04. The iFan03 and 02 are for 220v house power.
Now, we also know that I DO NOT LIKE THE SONOFF APP, Ewelink. It is a Cloud app and let’s face it, This is a Chinese company and it just does not really appeal to me to be pushing cloud information to a server in China. You have NO IDEA what is in that software and all I will say is:
“If someone is in your network………..THEY ARE IN YOUR WHOLE NETWORK”.
Fortunately for us Sonoff is 3rd party firmware compatible because it uses Internet of Things (IoT) wifi chips, likely the ESP8266. I use Tasmota and it is a breeze to flash because the board has a 4 pin header on it with labelled connections of 3.3v, Rx, Tx, and Ground.
iFan Pin Headers (click pic to enlarge)

There is even a drop down choice for configuring the module. Sonoff iFan03 (71)
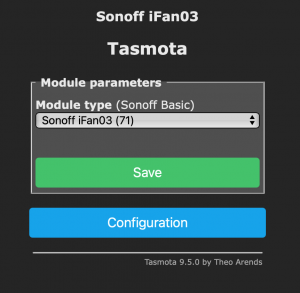
The iFan 03 and 04 are basically the same switch except for the capacitor size for 120v compared to 220v. Configuration is exactly the same. Another thing I like about Tasmota is that with the latest firmware and once you configure it with MQTT, it is automatically detected by Home Assistant Home Automation software and so easy to configure into your dashboard. It finds the light switch and the 3 speed fan switch.
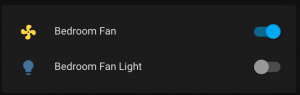
So, I can control it through the Tasmota web page it generates, by home automation software, Alexa finds it so I CAN VOICE CONTROL IT. And it comes with a remote control. The remote is a 433 MHz IR controller. If you don’t want to wake up your sleepy honey by saying “Alexa, turn on the bedroom fan” you can quietly do it with the remote.
Sure, this is kind of a niche device that you probably DON’T NEED. But if you have a big old country house built in the 1980’s like I do, and you DON’T want to pull the chains to control your ceiling fan…………then this is your jam.
Here’s a video that I made on the iFan04:
Bob is your Uncle and Boom Goes The Dynamite!
So, you will need to either leave the wall switch on all of the time or replace it with another smart switch (shelly, etc.). Is that correct?
I locked my switch on with a 3D printed wall plate lock.
It seems though you would not need a neutral wire at the main switch unlike most smart switches because the main switch would have to remain in the on position the whole time anyway. That is very helpful in older homes.
I use a sonoff TX for my wall switch, and ESPHome for all of my device programming and handling.
I am just about complete with my ifan component for esphome as well, which makes setting things up a breeze.
The relay in my sonoff TX is set to be a template switch, which i can manually turn off from home assistant or the web ui,
The buttons of the TX I have set to call home assistant services, the top button cycles through fan speeds, and the lower button toggles the light.
In conjunction with the IFan04 Component by ssieb,(which provides support for the remote) the system works wonderfully.
Now just to add a DHT11 to the IFan04 so I can do some automations based on temp at the ceiling ^_^
Hey CPYarger!
I am having trouble with my iFan04 and esphome. Would you be so kind to share your code with me? Would help a ton. Thanks a million in advance.
Hope you have a great day 🙂
Do your fan have starting wiring and running wiring?
I just programmed mine with with the tasmoto software but now I can’t get the remote paired. Is there something I’m doing wrong?