
One of my favorite programs for decoding digital audio is DSDPlus. I’ve been using it a couple of years to dissect and decode SINGLE digital signals. Like for instance if I’m in the airport or airport hotel I can listen to DMR radio where the baggage handlers are talking to each other, or the mall cops are planning how to be real cops. Or you can hear the hotel staff on their radios which is sometimes really fun.
BUT…….DSDPlus also follows Digital Trunked Radio. That is where there is a Control Channel which is monitored and then the calls are “trunked” to available frequencies allowing for more users to use the system without confusion. Also users can be placed into Talk Groups which keeps down the confusion even more. Entire cities can use one radio system to control municipal services such as Police, Fire, EMS, Public Works, Events, etc.
There are basically two different versions of DSDPlus. The “free” version and the “Fastlane” version. The free version decodes some digital signals and the Fastlane stuff is WAY more up to date and decodes a considerable amount more types of digital signals. Fastlane can only be received by sending $10 (for one year) or $25 (for lifetime) updates to the developer.
So it’s kind of tricky and unusual to install. It is a Windows program but you can use it on Linux or Mac by using Wine but not sure you can successfully trunk or not using Wine.
I had some pain figuring this out and the guys at radioreference.com graciously helped me through this.
You also need two SDR devices to make this work. You can use generic RTL-SDR devices or Airspy devices.
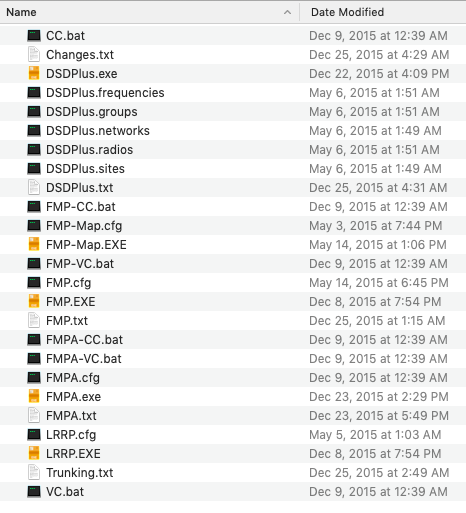
First you must download the DSDPlus v 1.101 version and the DLL files and unzip them all into the same folder. If using Fastlane you must then un-pack those files into the same directory (and overwrite some of the existing files).
Here are the files for v 1.101
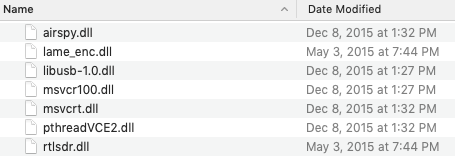
And here are the DLL files.
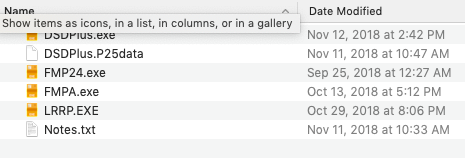
And these are the files for the latest Fastlane version.
Now that we have all these files unzipped into one folder you’d think we’re ready to roll. Maybe not. Do you have an Airspy device? If so you need the latest Airspy dll file from here. Unzip the file, select your platform (x64, or x86) and find “airspy.dll” and copy it into your folder.
Finally, if you are using Fastlane you need one more file. You’ll find this in the notes section.
If you are a new Fast Lane member, you should also download this file:

ftp://ftp.fftw.org/pub/fftw/fftw-3.3.5-dll32.zip

Extract the libfftw3f-3.dll file from the zipfile (it is the largest file in the zipfile)
and copy it to your DSD+ folder.
WOW. So download libfftw3f.dll and place it in the folder and NOW YOU ARE READY TO START DECODING.
“NOTE: It is now my understanding that there are files called FMP24.cfg, FMP24-CC.bat, and FMP24-VC.bat in earlier versions of FastLane. However I bought into FastLane just over a year ago starting with version 2p71. Those files do not exist in any FastLane version that I have so they must have been included in an earlier version. What I did on this page does work fine though. The developer of DSDPlus included this note in the latest release.. This is basically what I have done on this page.”
DSD+ 2.145
———-Setup
—–NOTE! YOU SHOULD ALWAYS BACK UP YOUR CURRENT DSD+ FOLDER BEFORE APPLYING A FAST LANE UPDATE!
YOU SHOULD ALSO PERIODICALLY BACK UP YOUR DSD+ DATA FILES
The DSD+ 2.145 files should be copied to an existing DSD+ 1.101 or higher folder.
If you do not have a DSD+ folder set up yet, go to DSDPlus.com and download
the most recent public version of DSD+ (currently 1.101) and unzip all of the
files to a folder on your PC. We recommend using C:\DSDPlus.Note: If you download DSD+ 1.101, you should also download the DSD+ DLL package
from DSDPlus.com
Now in order to decode we are going to have to run 4 files. Two of the files will be consistent no matter your hardware setup.
- CC.bat
- VC.bat
Try to follow along here. I have found that on the forums that many people will rename their batch files or describe them NOT using the exact file name. I will use exact file names here that are present in your folder full ‘o files. If you have two RTL SDR devices you’ll be using:
- FMP-CC.bat
- FMP-VC.bat
If you have one RTL-SDR and one Airspy you be using (this is recommended, you can swap the RTL and Airspy but then must also swap the CC and VC files):
- FMP-CC.bat
- FMPA-VC.bat
If you have two Airspy devices you will use:
- FMPA-CC.bat
- FMPA-VC.bat
For each of these bat files you will need to alter a config file. One called FMP.cfg and one called FMPA.cfg
For FMP.cfg I did rename my file to FMP24.cfg because you are actually going to run a program called FMP24.exe and it is going to look for FMP24.cfg which doesn’t exist. (God, this is odd). So my “new” FMP24.cfg looks like this:
2.4                                ; sampling rate (1.0, 2.0 or 2.4)
1024                               ; spectrum window width
32                                 ; FFT size (8k, 16k, 32k)
10                                 ; spectrum update rate in Hz
5000 -6250 7500 12500 15000 25000  ; step size table; units = Hz;negate default
.                                  ; DSD+ path
.\FMP-FreqList.csv                 ; primary frequency list CSV path\filename
.\FMP-FreqList2.csv                ; auxiliary frequency list CSV path\filename
miles                              ; search units (miles or kilometers)
99.9                               ; search distance
35.1048 -77.0441                   ; search origin
Note the sample rate of 2.4, the window size of 1024 and the last line will be your lat/long coordinates. Google “Your City Lat Long” to get them.
Now for an FMPA file you need the serial number of your Airspy device. You have to run some software to get it. Go here to get it. I believe airspy_info.exe is what you need. I just installed the airspyhost software on Linux from this page and got the serial number. The serial number is the 16 digit number and do NOT include the “0x” at the beginning. I made my serial number all X’s below. It goes on the top line. At any rate once you have it make your FMPA.cfg file look like this.
XXXXXXXXXXXXXXXX
2.5                                ; sampling rate (2.5 or 10)
1024                               ; spectrum window width
32                                 ; FFT size (8k, 16k, 32k, 64k)
5                                  ; spectrum update rate in Hz
5000 -6250 7500 12500 15000 25000 100000  ; step size table; units = Hz; negate default
.                                  ; DSD+ path
.\FMPA-FreqList.csv                ; primary frequency list CSV path\filename
.\FMPA-FreqList2.csv               ; auxiliary frequency list CSV path\filename
miles                              ; miles or kilometers
99.9                               ; search distance
35.1085 -77.0441                   ; search origin
Ok make sure the sampling rate is 2.5 or 10 and add your Lat Long again at the bottom.
Now lets configure the batch files, shall we?
First up…….And bear in mind this is MY installation with a generic RTL SDR device on the Control Channel (CC), and an Airspy device on the Voice Channel (VC). You may have to compensate if you are using 2 RTL’s or 2 Airspy’s.
- FMP-CC (for Control Channel)
FMP24 -i1 -o20003 -P0.0 -b9.5 -f853.8125 -rc
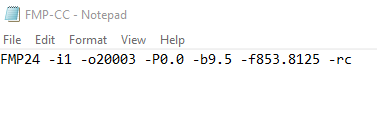
Take note that above I am using FMP24. -i1 is the first (only in this case) RTL device. -o20003 is the output port. The -P would be the amount of drift you have to compensate for. In my case with a good quality RTL SDR mine is Zero. -b9.5 is the bandwidth setting. -f is the frequency I am tuned to (in this case North Carolina VIPER system. -rc is receive.
- FMPA-VC (for Voice Channel)
FMPA -i1 -o20002 -rv
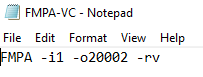
Won’t rehash the whole thing but the command is FMPA> First Airspy Device> Output Port> Receive Voice. The -fa means that it will auto decode.
“NOTE: In my video and previously in the directions for CC.bat and VC.bat I had a command of -f1. I’m now been told that is exclusive to P25 Phase 1 decoding. I have changed it to -fa to reflect auto decode. “
- CC (Control Channel)
DSDPlus -e -fa -i20003 -rc -OM NUL
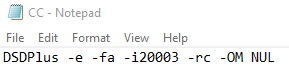
Just copy this fella as is. I’m told you don’t need the -F2. Try it with or without.
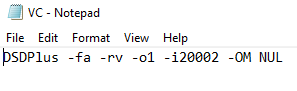
- VC (Voice Channel)
DSDPlus -fa -rv -o1 -i20002 -OM NUL
That should get you going. Simply go back and click on each one of those 4 files and a lot of stuff will start happening.
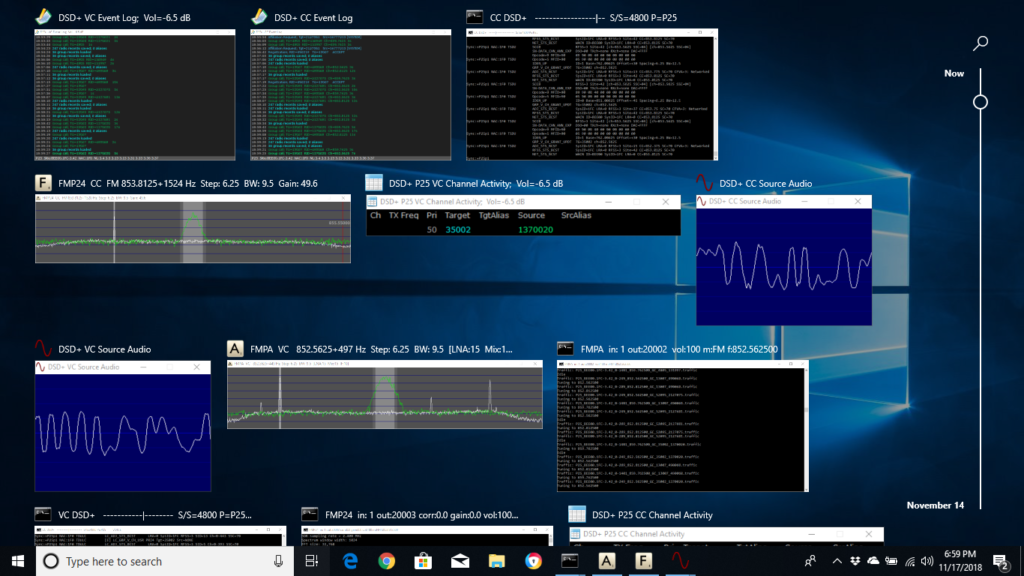
That’s a lot going on. But essentially you open FMP-CC which locks onto the control channel and opens a window depicting that. Then you open CC.bat which launches the program DSDPlus.exe which starts the decoding process. You can see the raw data flowing and a signal window and an Event Log. Then open FMPA-VC which is the Voice Channel decode and finally VC.bat which opens another instance of DSDplus.exe which site idle until there is activity.
The video below kind of shows it in action.
And this video below is an overview of the files and what happens when you launch each batch file individually. Unfortunately I receive no calls during this screen cast video but I can confirm the configuration works properly. The video above this one does show how it works when receiving calls at just past the one minute point.
Nice instructions! I run three RTL-SDR’s and I see you run one and an Airspy. I see the FMPA.cfg file requires a serial number for the second receiver. You keenly provide a link for software to do that but it is for AirSpy and I think Linux. I did track down RtlTool.exe. Nice tool – used it to rename a device before. However, when I run it the software shows only one device – not the three that are connected and that I routinely run. I see in SDR Console that I can see the serial numbers for the three devices. I tried changing one serial number there but it would no longer start so I changed it back. I also see that the CFG file is for an Airspy device. I presumed that FMP24.cfg would be for a RTL-SDR so I copied the code into that and fiddled around with the serial number several time to no avail. Do you have suggestions for a configuration with two RTL-SDR’s? I see the first batch file runs and when I start all 4 the control channel is being nicely decoded for P25 but the VC side can’t load the second RTLSDR because it has the same serial number as the first and or there is an issue with my syntax. Suggestions? My guess is that a lot of us have the two RTL-SDR configuration.
Can you put multiple lines in a file. In my area, all of the emergency services uses P25, but the fire departments uses a DMR setup.?
In other words, is there a way to do something like:
FMP24 -rc -i0 -o20001 -P0.0 -f769.43125c
Then somehow add a DMR line for my fire department.