
So I finally figured out OP25 and I have this brand new Raspberry Pi 3 B + laying around doing nothing. In this segment we’ll install OP25 on Raspberry Pi and then take our police scanner feed and send it to the internet on Broadcastify.
As someone pointed out to me yesterday, “There’s an app for that” they are indeed correct. You can get Police Scanner Apps for IOS and Android. Guess where the feeds in those apps comes from? If you said Broadcastify you’d be correct. So if no one is feeding your municipality then there will be no feed in the app. We will be that feed.
So the assumption is that you have a Pi with Raspbian installed and you kind of know how to use it.
The first thing we will do is to install GQRX. GQRX is not a requirement but I like GQRX, it pulls down all the rtl-sdr drivers and GNURadio which IS a requirement and I use GQRX to hone in on the signals from the Control Channels, so it is a useful tool to me anyway. Boot your pi, open a terminal and type the following commands.
sudo apt update
sudo apt install gnuradio libvolk1-bin libusb-1.0-0 gr-iqbal
sudo apt install qt5-default libqt5svg5 libportaudio2
sudo cp udev/*.rules /etc/udev/rules.d/
Now make a directory and download gqrx
cd
mkdir gqrx
cd gqrx
wget https://github.com/csete/gqrx/releases/download/v2.11.5/gqrx-sdr-2.11.5-linux-rpi3.tar.xz
Unzip the file (I just did a VNC session and did it in the GUI) otherwise you need a program called xz-utils
sudo apt-get install xz-utils
Once unzipped the program is installed. We’re not going to open or use it now. We got what we want. All you do is navigate to the folder that has the gqrx executable in it and double click or type ./gqrx to launch the program in a terminal.
Now install OP25. Go back to Part 1 of this blog to learn how to do that. Installing and configuring OP25 is the same on Raspberry Pi as it is on Ubuntu Linux.
Ok the assumption here is that you are up and running and decoding a stream.
You have to have a RadioReference or Broadcastify account now and you have to apply for a stream. I’m going to use RR as an example. Under RadioReference go to this link to apply to stream a channel. Fill out the requested information EXACTLY as they request or they will kick your request back. Mine got kicked back once.
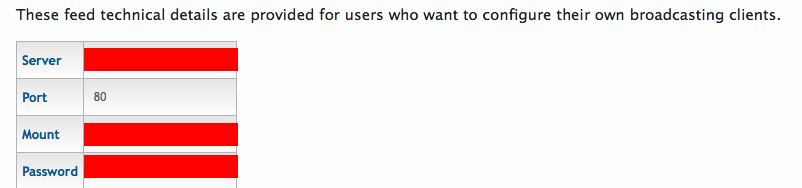
Once approved they’ll give you a link which contains a server address, a mount point, and a password.
Now go to this page to get the directions to stream to Broadcastify
All the directions come from his page. I DID NONE OF THIS.
sudo nano /etc/modprobe.d/bcm2835.conf
Insert the following:
softdep snd-bcm2835 post: snd-aloop
options snd-aloop enable=1 index=1 pcm_substreams=2
Hit CTL key + X key then Y to save the file
Now make an asound.conf file:
sudo nano /etc/asound.conf
# output device
pcm.loopout0 {
  type plug
  slave.pcm "hw:Loopback,0,0"
}

# input device
pcm.loopin0 {
  type dsnoop
  ipc_key 686592
  slave.pcm "hw:Loopback,1,0"
}

# duplex plug device
pcm.loop0 {
  type plug
  slave {
    pcm {
      type asym
      playback.pcm "loopout0"
      capture.pcm "loopin0"
    }
  }
}

# output device
pcm.loopout1 {
  type plug
  slave.pcm "hw:Loopback,0,1"
}

# input device
pcm.loopin1 {
  type dsnoop
  ipc_key 686593
  slave.pcm "hw:Loopback,1,1"
}

# duplex plug device
pcm.loop1 {
  type plug
  slave {
    pcm {
      type asym
      playback.pcm "loopout1"
      capture.pcm "loopin1"
    }
  }
}
Hit CTL key + X key then Y to save the file
You just made a loopback device. On Windows this is kind of similar to Virtual Cable where you take your audio and pipe it into another program. Because you changed the audio source you need to change a couple things in the way you invoke OP25. I went back to my script file and changed the stuff in bold:
./rx.py --args 'rtl' -N 'LNA:47' -S 250000 -f 857.2625e6 -o 17e3 -q -2 -O loop0 -T trunk.tsv -V -2 -U 2> stderr-stream0.2
So your sound device is now the loopback device and you’re passing the stream.
Now get darkice
sudo apt-get install darkice
Now make a config file:
sudo nano /etc/darkice-stream0.cfg
Paste in the following making sure to change all your data in red:
# sample DarkIce configuration file, edit for your needs before using
# see the darkice.cfg man page for details

# this section describes general aspects of the live streaming session
[general]
duration        = 0        # duration of encoding, in seconds. 0 means forever
bufferSecs      = 1         # size of internal slip buffer, in seconds
reconnect       = yes       # reconnect to the server(s) if disconnected

# this section describes the audio input that will be streamed
[input]
device          = loop0  # OSS DSP soundcard device for the audio input
sampleRate      = 22050  # sample rate in Hz. 22050 is the RR Standard
bitsPerSample   = 16     # bits per sample. 16 for mono feeds, 32 for stereo feeds
channel         = 1      # channels. 1 = mono, 2 = stereo

# this section describes a streaming connection to an IceCast server
# there may be up to 8 of these sections, named [icecast-0] ... [icecast-7]
# these can be mixed with [icecast2-x] and [shoutcast-x] sections

# If you want to send to your own icecast server, you basically copy
# this whole section and put in the values to point the feed to your own
# server instead of the RR information below

# Don't forget, the name [icecast2-0] needs to change to [icecast2-1]
# and 2 and 3 as you add more feed destinations.

[icecast2-0]
# The audio format to encode to, we're using mp3 here
format          = mp3

# The bit rate mode to use, the commented out lines are for a fixed bit
# rate "constant bit rate" at 16 bits.  I prefer the variable bit rate
# for the sound quality it has and the throughput is very similar on avg

#bitrateMode    = cbr
#bitrate        = 16

sampleRate      = 22050     # sample rate in Hz. 22050 is the RR Standard
bitrateMode     = cbr
bitrate		= 16

# Quality at .1, max is 1.0, but as you increase, so does the bandwidth
# used.  For mono scanner audio .1 is totally fine.
quality         = 0.1

# Takes the input and mixes it down to a mono output for the feed.
channel         = 1

# Cuts frequency response over 5kHz.  For scanner feed this mostly
# eliminates hiss and harshness on paging tones.  Saves a bunch of
# bandwidth as well.
lowpass         = 5000

# Server shown on your RR feed owner page that hosts your feed
# You need to log in to RR, go to Account -> My Live Audio Feeds ->
# click the feed owner page icon at the far right of your feed listing.
# Then you will see all this information.

# From Feed Technical Details, the "Server"
server          = SERVER.broadcastify.com

# From Feed Technical Details, the "Port"
port            = 80      # port of the IceCast server, usually 8000

# From Feed Technical Details, the Password exactly as shown
password        = PASSWORD

# From Feed Technical Details, the mount...remove the leading "/", it's
# not needed in this file.  So if it is /999999 make it just 999999
mountPoint      = MOUNTPOINT

# name of the stream
# On My Live Audio Feeds, it's the first part ending in a colon ":"
name            = Short name

# On My Live Audio Feeds, it's the part in parentheses in the Feed name
description     = Description
Hit CTL key + X key then Y to save the file
Now start your OP25 instance as you did from lesson 1. I used a script file. I tried and tried and tried to use the start at boot systemd script on the tutorial page but it just wouldn’t work. My script file is called “op25.sh” and is located in the /home/pi/op25 folder. I finally figured out to start it at boot I call it from a crontab. OP25 needs to run in a terminal so I installed screen and did the following command from crontab -e
@reboot /usr/bin/screen -d -m /home/pi/op25/op25.sh
Or you can start it like this:
I finally figured out I could invoke that from the service file as well.
sudo nano /etc/systemd/system/op25-stream0.service
[Unit]
Description=op25
After=syslog.target network.target nss-lookup.target network-online.target
Requires=network-online.target

[Service]
User=pi
Group=pi
Type=forking
ExecStart=/usr/bin/screen -d -m /home/pi/op25/op25.sh
RestartSec=5
Restart=on-failure

[Install]
WantedBy=multi-user.target
Ctl + X then Y to save
sudo systemctl enable op25-stream0.service
sudo systemctl start op25-stream0.service
Now to start darkice is pretty easy. From a terminal type the following:
darkice -c /path/to/darkice.cfg
In my case that is
darkice -c /home/pi/darkice/darkice.cfg
If you followed the Tutorial from the other page it is probably in /etc. It doesn’t matter where it is or what you call it as long as you point to it after running the darkice command.
To launch it automatically at boot type
sudo nano /etc/systemd/system/darkice-stream0.service
Paste in the following making sure to get the darkice.cfg path right:
[Unit]
Description=darkice-stream0
After=syslog.target network.target nss-lookup.target network-online.target
Requires=network-online.target

[Service]
ExecStart=/usr/bin/darkice -c /etc/darkice-stream0.cfg
RestartSec=5
Restart=on-failure

[Install]
WantedBy=multi-user.target
Now enable and start the service
sudo systemctl enable darkice-stream0.service
sudo systemctl start darkice-stream0.service
Now when you reboot OP25 should start and run, and darkice should be streaming to your feed.
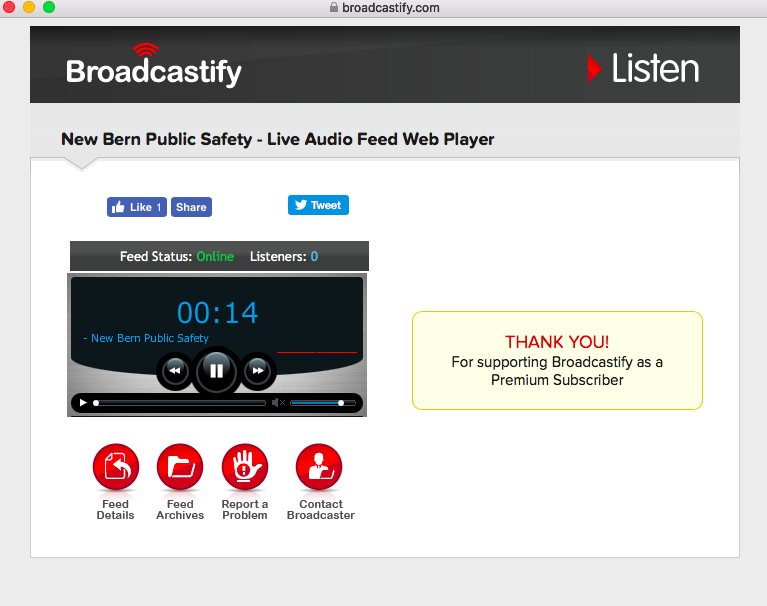
Here’s my feed.
I’m getting:
E: Unable to locate package libvolk1-bin
Try:
sudo apt-get update
sudo apt-get dist-upgrade
sudo apt-get libvolk1-bin
Thank you for the guide! Took a few hours of trial and error, but got it working!
Now I’m wondering, is it possible to encode the alpha-tags and send those to broadcastify, or is that going to involve an entirely different setup?
Thanks for this guide! I followed it and have my set up working in Oxford NC.
https://www.broadcastify.com/listen/feed/29533
A few thing that I had issues with that might help others:
When you talk about installing screen, Users will need to:
sudo apt install screen
Also I had an issue that the gnuradio didn’t find the RTL-2832U SDR due to bug #528 The following website solved that issue:
https://lists.gnu.org/archive/html/discuss-gnuradio/2015-01/msg00160.html
Modify or create a file: etc/modprobe.d/rtlsdr.conf
and add:
blacklist dvbusbrt128xxu
blacklist e4000
blacklist rtl2832
Then reboot
Also I have found that my stream cuts every 12 hours (which I still need to investigate) I have made a new .sh and added to my aliases to quickly bring the stream back up.
first create a file broadcastify.sh
sudo nano /home/pi/broadcastify.sh
#! /bin/sh
sudo systemctl start op25-stream0.service
sudo systemctl start op25-stream0.service
bash /home/pi/op25/op25.sh
[CTRL]+[X], [Y], [ENTER}
Create alias
sudo nano .bashrc
##OP25 alias
alias op25=’bash /home/pi/op25/op25.sh’
alias bcst=’bash broadcastify.sh’
Whenever my stream crashes, I can bring it up easily by typing this in terminal:
bcst
op25
Lastly, you may want to make a white list to allow certain talkgroups. In the same folder as your trunk.tsv file make a .csv with a list of talkgroups in column A that you want (Talkgroup # only) save the csv as {whatever}.wlist(do not leave .csv as the extension, delete it out), in my case oxford.wlist. Open up Trunk.tsv and add the wlist file under the column whitelist, if you wnat only one TG, you dont need to add .wlist file you can simply typ the TG you want decode.
Again, thank you for making this guide. I have a few issues but it seems to be minor. I figured I’d add this with the hope it will help someone else.
Thanks. I added your alias trick to my other page. Soon as I get a chance I’ll look this over as well. I also had some crashing but I set a cron to reboot daily which seems to do the trick. Thanks again!
Right on! I’ve got it working perfectly. no need to log in and run the alias. I’ve got my pi rebooting a 8AM and 8PM everyday to prevent crashing. Thanks for the idea. This is what I did:
crontab -e
@reboot /usr/bin/screen -d -m bash /home/pi/op25/op25.sh
0 8 * * * /sbin/shutdown -r now
0 20 * * * /sbin/shutdown -r now
[CTRL]+[X] [ENTER] [Y] [ENTER]
This was a great guide! I got my setup going and I’m currently streaming to a private Icecast server until I’m sure it works solidly, then I’ll look into adding my site to Broadcastify. Thanks for the Raspberry Pi guides, the last time I tried to use one it just couldn’t keep up. Seems to work great now!
I can not get the op25.sh to run. I keep getting a Permission Denied in the terminal. Any solution?
1. cd to directory where op25.sh file is
2. ls -lt ./op25.sh #this should show the perm settings(r=read, w=write, x=execute) for the owner, group, and other users for op25.sh
3. make sure that the execute (x) permission is set. If not, use the chmod command to set the ‘execute’ permission for op25.sh. You must be either the ‘owner’ of the file, or use ‘sudo’ or ‘root’ id to chmod the file.
4. Another alternative to step 3 is to call/execute op25.sh using ‘bash op25.sh’ or ‘bash /path/to/op25.sh’
Disclaimer, I have not installed any of the software. My answer is based on my experience when your can not execute a shell file (and get a permission denied error msg).
HTH
On Raspberry Pi 3 B+ with fresh copy of Raspbian Buster with desktop “2019-06-20-raspbian-buster”
After issuing step four, or the command:
sudo cp udev/*.rules /etc/udev/rules.d/
I get the error:
cp: cannot stat ‘udev/*.rules’: No such file or directory
I got it to work, the solution as to revert to a prior version of Raspbian, and AFTER Gqrx cd the proper directory.
After Gqrx is installed:
cd /home/pi/gqrx-sdr-2.11.5-linux-rpi3/
sudo cp udev/*.rules /etc/udev/rules.d/
I really appreciate this tutorial. I was able to get the latest Raspbian Buster to work with the instructions.
The only change is this.
After unzipping the gqrx-sdr-2.11.5-linux-rpi3.tar.xz file:
cd /home/pi/gqrx/gqrx-sdr-2.11.5-linux-rpi3/
sudo cp udev/*.rules /etc/udev/rules.d/
Raspbian Buster keeps getting broken, library updates are not compatible right now with OP25.
You will pardon me if this sounds naive in nature, but I am intrigued by the use of a Raspberry Pi. However, in your instructions, you seem to refer to programing the Pi.
Being that the Raspberry Pi has no monitor or keyboard, how on earth do you see what the device is doing, or not doing? Plus as I was able to gather, there is no audio jack on the Pi, so how does one listen to the output of OP25?
I asked the same questions when FlightAware dropped Windows based feeding, but got absolutely no response. So I chucked the Pi since at that time it was useless.
None the less, I am willing to purchase another one IF I can figure out how one can observe what the device is doing, and listen to it.
Please note that I currently have OP25 operating in Ubuntu via VirtualBox (and it runs flawlessly). It took 3 months of toying with it, but oh well.
I was going have the shop in town convert a laptop to Ubuntu, however the Tech had no idea what or why one would want dump Windows and run Linux, so I just gave up that idea.
Ken,
From your other post I’d guess you have the stick to it – ness to work your way through the Pi. My directions are made on the assumption that you are setting the pi up headless (no mouse, keyboard, Monitor). You have to program the Pi from another computer hooked up across the network via Secure Shell (SSH). On Windows most use a program called Putty. In Mac I just use the Terminal program.
Dig around on SSH and your answer lies there. Once you figure it out you can do ANYTHING with a Pi.
Awesome write ups (this one and your others). Much appreciated, especially as someone who touches Linux once a year and then forgets everything.
Once update you may want to make to the post, and one question.
Update:
The asound.conf you pasted includes smart-quotes/curly-quotes/whatever you call them (“these” vs “these”). Tracking down the reason my audio wouldn’t start was easy once I saw there was an illegal char at the end of each line with quotes – but threw me for a few.
Question:
I understand the concept of screen to the extent one would use it from a command line so they could open something and switch “instances” of shell if you will. I’m not clear on how it works when used in a service. For example, I see it in my list of services, and I know it’s running, but I can’t quite figure out how to “see” or open that terminal. Typing “screen” and then hot-keying for all open sessions shows none are open, as I suspect it’s a different instance of screen (rather than a different shell instance within screen). Any tips here? In short – if I were to set up the service like you have, and wanted to log into the box to see what talkgroups were active (for example), how would I actually see the running op25 terminal instance?
Thanks again!
Answered my own question! screen -r will bring it up! ctrl a then ctrl d to head back to the command line. Pretty handy!
Thanks again!
Excellent article. I’m now streaming my local Police P25 system via Pi 3 Buster/OP25 thanks to you! Works like a champ!
73,
-S
Did you ever find a solution to get op25 to open at startup? I tried the screen method, but when I use screen it disables my mic input ( I have no idea why ). Basically I am streaming the op25 to discord on the same machine, I just ran the stereo cable from the headphone out to the mic in and adjusted levels and it works great, I just can’t get it automated because if I dont reboot it every day it just locks up completely.
i found using this settings work better
[general]
duration = 0 # duration in s, 0 forever
bufferSecs = 1 # buffer, in seconds
reconnect = yes # reconnect if disconnected
[input]
device = plughw:1,0 # Soundcard device for the audio input
sampleRate = 44100 # sample rate 11025, 22050 or 44100
bitsPerSample = 16 # bits
channel = 2 # 2 = stereo
[icecast2-0]
bitrateMode = cbr # constant bit rate (‘cbr’ constant, ‘abr’ average)
#quality = 1.0 # 1.0 is best quality (use only with vbr)
lowpass = 5000
format = mp3 # format. Choose ‘vorbis’ for OGG Vorbis
bitrate = 320 # bitrate
server = localhost # or IP
port = 8000 # port for IceCast2 access
password = hackme # source password for the IceCast2 server
mountPoint = feed.mp3 # mount point on the IceCast2 server .mp3 or .ogg
name = Scanner
run this command
./rx.py –args ‘rtl’ -N ‘LNA:47’ -S 2400000 -f 168.1000096 -o 25000 -q -2 -O default -T trunk.tsv -V -2 -U 2> stderr-stream0.2 -l ‘http:0.0.0.0:8080’
sudo nano darkice.cfg
Then copy and paste these configurations in the file:
[general]
duration = 0 # duration in s, 0 forever
bufferSecs = 1 # buffer, in seconds
reconnect = yes # reconnect if disconnected
[input]
device = default # Soundcard device for the audio input
sampleRate = 44100 # sample rate 11025, 22050 or 44100
bitsPerSample = 16 # bits
channel = 2 # 2 = stereo
[icecast2-0]
bitrateMode = cbr # constant bit rate (‘cbr’ constant, ‘abr’ average)
#quality = 1.0 # 1.0 is best quality (use only with vbr)
lowpass = 5000
format = mp3 # format. Choose ‘vorbis’ for OGG Vorbis
bitrate = 320 # bitrate
server = localhost # or IP
port = 8000 # port for IceCast2 access
password = hackme # source password for the IceCast2 server
mountPoint = feed.mp3 # mount point on the IceCast2 server .mp3 or .ogg
name = Scanner