
NOTE: I lost this page somewhere along the line and found it on the Internet Archive WayBack Machine. Just saving it for posterity.
RepRap 3D Printer

Did you ever look at the price of a good quality 3D printer and think “I wish I had one, but that’s too expensive”?
Well it’s not as bad as you might think. An Open Source Community has sprung up around 3D printers called RepRap. The whole point being the printer is self replicating meaning you can print a new printer from your printer. (That boggles the mind, huh?) A decent RepRap kit will only set you back about $300 or $400. That’s not so bad?
This is kind of a quick glimpse into my 3D printing journey so far and where I’m taking it.
First of all there are literally dozens of RepRap variations. I figured at least initially I better stick with the one that is well documented and common. After some research I settled on a version called the Prusa i3 and more specifically the RepRapGuru Kit of the Prusa i3.
I actually found the same guy selling the same kits on eBay with a “Best Offer” button and offered a little bit less than the Amazon price and he agreed. And so it begins.
READ AND HEED
Even though I documented some issues these in no way, shape, or form detract from this kit. This is me documenting issues that heck, maybe I even caused. This was my first attempt at anything like this. Nothing written here should be construed as me not loving this kit. This kit is amazing. It does however have a learning curve. You just have to expect that. I mean for God’s sakes……..you’re building a 3D printer.

I have got to forewarn you that you are not going to take this kit out of the box, build it in a couple of hours and start cranking out high quality parts.
THIS IS A DIY KIT AND REQUIRES SKILL, PATIENCE, PERSEVERANCE, KNOW-HOW AND A LITTLE BIT OF MACGUYVER-ISM
It literally took me about 2 or 3 weeks of tinkering before I was cranking out parts and there were some problems along the way. Don’t buy this kit if DIY and overcoming obstacles aren’t part of your nature.
However that being said is that 2 or 3 week process of trial and error and break and fix will LEAD TO AN AWESOME UNDERSTANDING OF 3D PRINTERS AND 3D PRINTING. And that my friends is worth every penny and every minute of downtime. Then if you want to move up into the world of commercial machines you’ll be a pro. After buying and using this kit you’ll literally be able to build your own system from parts and make it bigger and badder. I’m already creating the plans for my uber 3D printer in my mind now.
The kit literally comes with no instructions but with a link to manuals and software and computer firmware. If you want a printed manual you’ll have to print it yourself. In my mind this is no big deal. I liked building from a computer screen where I could zoom in on things to see.
The RepRapGuru kit is very complete and the instructions are very well written. The parts are VERY CLEARLY MARKED and bagged up intelligently. It was easy to locate things. It took me about 8-10 hours to build the kit over the course of 2 days. And once I built it and tried to print something……..NOTHING HAPPENED. Then something happened but no plastic came out. Then once something happened and plastic came out the extrusion hot end broke. It was a MOSFET on the RAMPS control board. Don’t know what that is? This kit may not be for you. I pulled a MOSFET that controlled the fan and soldered it in the extruder position and then hard wired the fan to the power supply. God I’m smart. Then the MOSFET for the heated bed burned up. My conclusion. Cheap components on the RAMPS board. Ultimately I just ordered some quality MOSFET’s and soldered them in. Can’t solder, you say? A RAMPS 1.4 board is around $10. Buy a spare. Heck, buy two.
Hey, look. This is a $300 3D printer. There are a lot of parts in the kit, great instructions, preprogrammed firmware and software. I can promise you the RepRapGuru is not making millions selling these kits. This is a beginners kit and even though I had some issues I FULLY STAND BY THIS KIT. It’s a great kit. If you’ve never had a 3D printer kit or ever 3D printed there are going to be some problems. There just are. That’s why you bought a kit, because you like the challenge. Again don’t view anything said here as negative.
But the parts are not the highest in quality. But they are not the worst either. Look this is how it goes……put a DIY Open Source project on the internet and dozens of people will hack it and improve it. “These bearings are made by Indian Princess Virgins at Dusk on the Summer Solstice and are superior to your bearings.” Part of the joy of DIY building is to upgrade. Like the Geico commercial says…… “It’s what you do”. Anyway here is the stock kit in action.


I’m sorry but this is just cool. It just is.
If you can imagine it, somebody has made a 3D design for it and placed it on a website called thingverse.com for free download. There are dozens of free download sites that have very cool 3D printing files for FREE. Did I mention it was free?
So now that I’m rolling good here’s my list of “Pro’s”
– Great kit
– Incredible Learning Experience
– Good instructions
– Great Tech Support (owner talked to me on the phone for an hour once and they answer emails quickly)
– Lots of free files for printing. Useful files.
Here’s are the “Con’s”.
– Inexpensive clone parts
– Some 3D construction parts printed poorly. Mostly cosmetic. Once you’re up and running print new ones!
– Cheap bearings. Cheap Chinese bearings. (ball bearings literally fell out of a couple of them)
– Hot End and extruder alignment problems. That’s why no plastic was coming out. The metal block below the extruder is hand drilled and just about doesn’t line up. It was fully assembled when i got it, and that’s all good right until something goes wrong and you have to disassemble it and put it all back together.
Here’s what I did to my kit to improve:
– Replaced the MOSFET’s in the RAMPS board. Soldering knowledge required. Used these from mouser.com
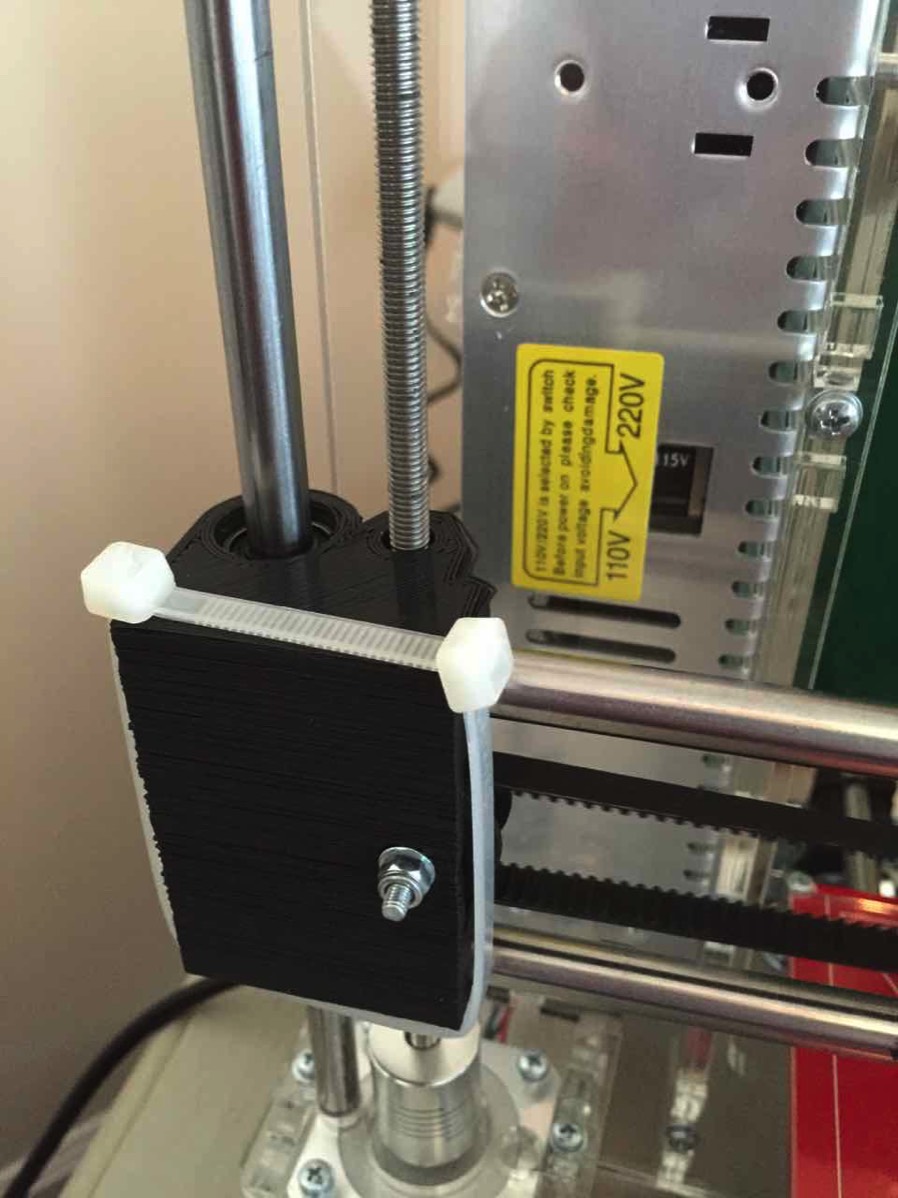
– Printed new parts to replace the ugly or poor fitting ones. Perfect results. Here’s a pic of the X-Idler that I had to zip tie to keep together. The laminations split in this the day I installed it. It was poorly printed. You can see the separations in the layers.

– Ordered new bearings from Misumi Their part number is LM8U and they are $5.55 a piece! Cheap Chinese bearings are looking good about now!
– Ordered a new hot end. E3D Version 6 is supposed to be the best thing going.
Mounting that new E3D hot end requires some new parts. First you need a new X Carriage Mount for Bowden
you print the carriage and the clamp from the files.
You also need to print the X-Carriage.stl from the files on this page. That is the new carriage that holds the linear bearings and we’re mounting our new E3D on here. There are now 4 bearings instead of 3 from the stock kit.
Here is the X Carriage Mount on left and X carriage it mounts to:


Now here’s the whole thing assembled:

The installation above is referred to as a “Bowden Feed” as opposed to a Direct Feed which sits directly over the top of the hot end and pushes the material down directly into it. That puts a lot of weight on the Z and X axis because the NEMA 17 motor is sitting up there too, and in my mind made the whole thing tilt forward a bit.
So what I did was printed something called a Compact Bowden and it looks like this:

At first I thought the slipping was caused by some debris in the teeth however it wasn’t predictable and seemed more tied to the movements of the extruder rather than some flat point or certain area of clogged teeth.
The RepRapGuru kit has you set the Extruder motor (E0) at .550mV during assembly and while that is a very correct voltage setting for their direct feed it just isn’t enough for the Bowden feed pushing up instead of down and pushing a considerably longer length of filament. I did not measure my voltage but I will say that I just turned the potentiometer up a little. No more slippage. Perfect.

Now you have to calibrate it to make sure that you’re extruding out exactly how much material the software expects. High quality prints rely on your machine being perfectly calibrated. It’s a tricky situation and tough to explain here without great detail but there is a great video here that explains it. The calibration section starts at 10:15.
My setup was that I wanted 50mm and realized 44.57
So divide 50 by 44.57
50/ 44.577 = 1.1216
My firmware was set for 90 steps (not 100 like in the video) so then multiply your sum by 90
1.1216 x 90= 100.94
Change the firmware value in the file called “configuration.h” and upload the firmware to the Arduino board.
Here’s what happened then when I extruded 50mm after calibration.
50mm = 1.96” BAM! Nailed it.


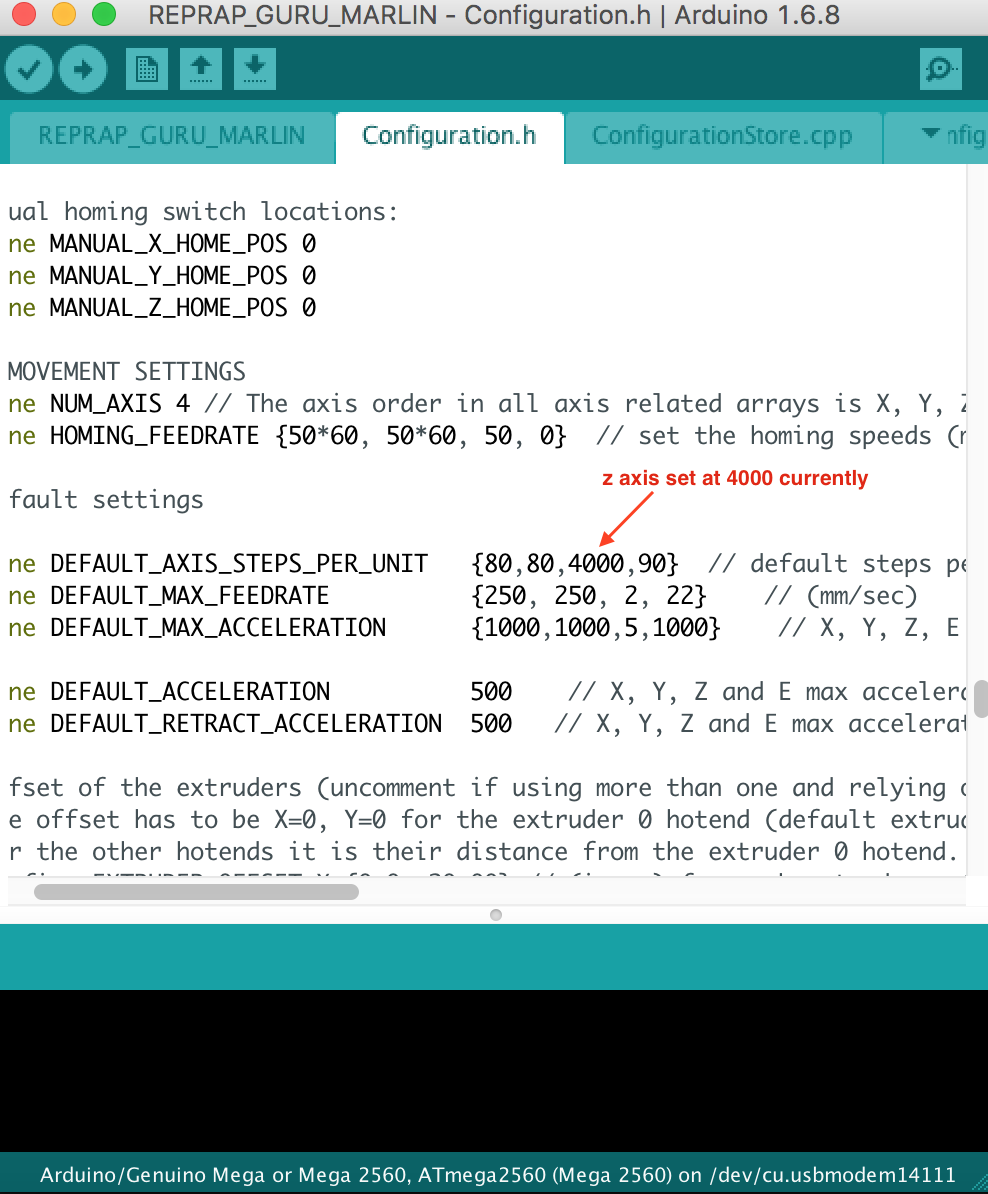
Go to this page to calculate and scroll down to the Lead Screw section and fill it in like so. My number for the firmware was 400 instead of 4000
Make sure you change the lead screw pitch to 8mm which is the amount of travel for one full revolution.


I hope this somehow helps someone. It’s been a great experience. Buy the kit, put in the time. Doesn’t take long to get to “Expert” level. A few weeks ago I was scared to death, now I’m redesigning the thing.
Lastly if you have a kit anything you need spare parts or upgrade parts. Here’s a quick list of things that could make your life easier.
– 3mm screws, nuts, and washers in various lengths. Extend that to 4mm and 5mm hardware as well.
– zip ties, spiral cable wraps,
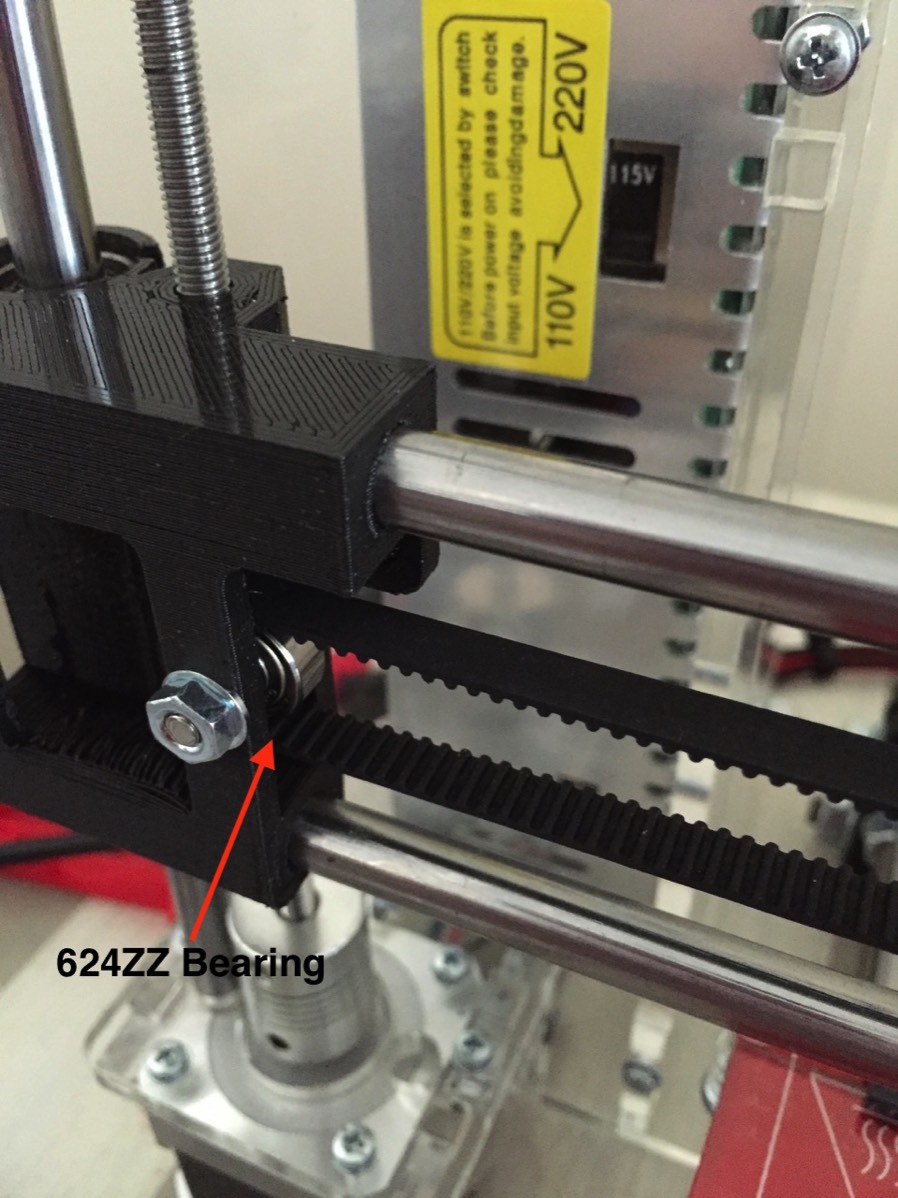
– 608zz bearings. Although the kit doesn’t require them tons of cool projects you can build do. Get some.
– 624zz bearings. Prusa i3 upgrade kit has a need for one for the side to side (Y) axis. Also other projects use them.
– Spare RAMPS 1.4 board. $10 tops. For that matter buy another spare clone Arduino board. You could replace the whole computer in just a couple of minutes.
– Stepper Motor Driver – This is one item I DON’T recommend you get. Why? The kit has a spare on it already. The stepper motor driver plugged into E1 controls nothing. Nothing unless you have a dual extruder kit. You already have a spare. They cost like $5 though.
– GT2 timing belt. The kit has two belts. Keep a spare belt around. Who knows.
– NEMA 17 motor. This one is kind of way optional, however say you’re building a new fancy extruder. Extruders need motors. You have to take apart what you have to build the new one. In most cases that is okay, but what if it doesn’t work. I took apart my kit extruder to build my Bowden Extruder. A bunch of parts fell out, I put them in a bag, and I’ve no real idea how to reassemble it. If I had a spare motor I could have just set aside the old extruder and I’D HAVE A SPARE FOR AN EMERGENCY NOW. Yeah, I could figure out how to rebuild it, but why do that unless you have to?
– 100k Thermistor. Get one. They go bad sometimes.
– Hobbed gear. For the new extruder. I use a MK7 hobbed gear for a 5mm shaft. Someday you’ll need one.
– Digital or Dial calipers. Okay, this isn’t a spare. This is a tool. But you need one. You do. Trust me. Did you see how I measured the extrusion rate above? Don’t buy a special one just for millimeters either. Just go into Google and type “50mm to inches” BAM! Best converter in town and free. I bought my dial calipers in the late 80’s. It’s still a precision tool.